Monday 30 October 2006

MythTV : How it flags commercial advertisements

MythTVMythTV is a Free Open Source digital video recorder project distributed under the terms of the GNU GPL. In a previous post, I had written about the features of MythTV and listed a number of MythTV sites which provide help in installing MythTV and configuring it to work on ones machine. MythTV is a GPLed software which allows one to watch TV on ones computer. It has capability to intelligently detect commercials in the TV programs and skip through them.

The result is an advertisement free program for your viewing pleasure. I have at times wondered about the technique used by MythTV to accurately detect the times when the ads come up and successfully skip them. It seems MythTV has a variety of tricks up its sleeves.

MythtvPVR - an unofficial site dedicated to MythTV personal video recorders has an interesting article which explains all the techniques used by MythTV to successfully flag all the commercial advertisements and skip through them to provide a non-interfering viewing of your favorite TV soaps.

Saturday 28 October 2006

What is Free Software? - an interview with Richard M Stallman

In recent times, if you ask me to name one personality in the free software community who has been as much reviled as being adored, I would say it is Richard M Stallman - the father of GNU. He has been bashed in the media as much for his dedication towards furthering the cause of free software and his firm stand against DRM. I believe that if not for GNU and GPL, the Linux movement would have been a non-entity. It was GNU which provided the wings to Linux to soar up and meet the competition head on. In many ways GPL gave it the moral edge over the BSDs which are also released under a free license.

Recently Robin Good had the honor of putting up RMS at his apartment in Rome and he used this occasion to ask him a couple of questions regarding free software. And RMS was good enough to clarify his doubts. During the course of the interview, he asks the following question :

RG: To support those, who like me, favor change over the control exercised by large corporations and media, what are the type of actions that individuals can take?

Richard Stallman: I wish I knew.
This is the greatest political question of our time.
How can we put an end to the empire of the mega-corporations and restore democracy? If I knew I would be the savior of the world.
What I think I can tell is that the media are crucial.
The power of the corporate media enables truth to be suppressed and lies to be passed as truth.
You’ve probably heard that a half truth can be worse than a lie. A lot of the things that our government’s and media say are one-tenth truths, nine-tenths lies. And it doesn’t take many of them together to create a completely fictional world view...
So I recommend that people stop listening to the mainstream media. Don’t watch television news, don’t listen to news on the radio, don’t read news on ordinary newspapers. Get [your news] from a variety of web sites, which are not operated under the power of business money, and you have better chance of not being fooled by the systematic lies that they all tell, because they’re all being paid by the same people to tell the same lies. Or nine-tenths lies.
Read the rest of this interesting interview.

Thursday 26 October 2006

A brief look at a couple of new features in Firefox 2.0

Firefox ver 2.0 was released a few days back and naturally it is loaded with a host of new features some of them prominent and many more rather subtle. I found this new version to be a huge improvement from the older 1.5.x version which is bundled with most Linux distributions. These are some of the new features in ver 2.0 of Firefox which I found really interesting.

New features in Firefox 2.0
A better theme - The new Firefox 2.0 theme and user interface has been subtly revamped to provide a better user experience. For example apart from the Bookmarks menu, you have got a History menu (previously named 'Go' menu) which lists not only the recently visited websites but also the recently closed tabs. You can also open your browsing history in a side bar using the 'Ctrl+H' hot key.

Built-in Phishing protection - Think of the last time you were confronted with an email supposedly from Paypal which provided a link which directed you to a seemingly valid webpage of paypal which was actually a spoof of the original page. This sort of social manipulations are popularly known as phishing attacks. Phishing is a form of identity theft that occurs when a malicious Web site impersonates a legitimate one in order to acquire sensitive information such as passwords, account details, or credit card numbers. Now Firefox has inbuilt phishing protection which provides a warning about the webpage you are visiting if it happens to be a known offender.

Fig: Firefox warns when you encounter a Phishing site

Enhanced search capabilities - One of the most convenient features of Firefox in my opinion is the search box at the upper right corner of the web browser. You type a search query in this box and press enter and your search results are displayed in the browser window. By default, it is set to Google search. But it also provides a drop down menu from which you can choose other search engines including Wikipedia and Websters Dictionary. In fact this search list is modifiable and Mozilla has a collection of diverse search sites which can be added to the search engine list. Of course, this is a feature which was available in previous versions of Firefox. What is new is that when you type in the search query, search term suggestions will automatically appear. There is also a revamped search engine manager which allows you to add, delete and re-order the search engines in the list.

Fig: Provides search term suggestions as you type in.

Improved tab browsing - This is one of the most visible, new feature in Firefox 2.0. Unlike earlier when all the tabs had a single close button positioned on the right hand corner, now you have a close button for each tab a.k.a Opera style which makes it easier to manage. All new windows are automatically opened in new tabs. Earlier when you had innumerable tabs opened at the same time, the tabs used to spill over beyond the viewing area and there was no easy way to manage the tabs. Not so this time. When the number of tabs increase, Firefox automatically makes available a navigator in the tab pane area on both sides which can be used to get to the non-visible tabs. But the one improvement which I like so much is the undo close tab functionality. This works as follows. Suppose you have closed a tab accidentally and you forgot the address of the webpage. In the new version of Firefox, it is a simple case of just right clicking on any tab and selecting the option "Undo Close Tab" and the tab which you accidentally closed will be opened with the prior website loaded.

Fig: Close button on each tab.

Resuming your browsing session - This is another feature which I find really useful. If at all your computer just rebooted while you were seriously checking out a couple of websites in Firefox maybe because of a power fluctuation or a surge (has happened to me a number of times), the next time you open Firefox, it will offer to resume the previous browsing session and you can continue from where you had left.

Previewing and subscribing to Web feeds - Prior to ver 2.0, even though there was a facility to subscribe to web feeds (RSS,Atom...), if you needed any further functionality, you had to depend on extensions. Now though, this feature has been significantly revamped. You can preview the web feed before you subscribe to it. What is more, you can opt to subscribe using Live feeds (default in Firefox) or any of the other web services that handles RSS feeds such as bloglines, Google reader, My Yahoo or one of your own.


Fig: Enhanced feeds subscription

Inline spell checking - Firefox 2.0 comes with inline spell checking functionality. What this means is that when you enter text in a form element such as a text area, Firefox underlines the mis-spelled words in real time. And the user need just place the mouse cursor on the highlighted word and right click to receive a number of suggestions to the mis-spelled word.

Fig: On the go spell checking of form elements

Improved Add-on manager - Firefox 2.0 has merged the add extensions dialog and add themes dialog into one integrated tool.

Support for JavaScript 1.7 - This is a new addition to Firefox. There is a good article on what is new in JavaScript 1.7 at Mozilla Developer Center.

Installing Firefox 2.0 in any Linux distribution

I use a fail safe recipe in installing Firefox 2.0 in GNU/Linux and it works without fail which ever be the distribution. There is nothing to it really, just download the Linux version of Firefox 2.0 from the official website and unpack it in the directory /opt (You will need root access though). Once it is unpacked, you can create a link on your Desktop to the Firefox binary in the /opt/firefox location. The beauty of this method is that the new version of firefox will co-exist with the firefox version which was installed by default in your Linux distribution. Not only that it will also use all the bookmarks and extensions which you have installed in the older version of firefox as long as they are compatible with the new version.

As I stated earlier, the latest version of Firefox has a lot to offer in terms of added features which imparts a new meaning to the word convenience.

Wednesday 25 October 2006

Book Review: Building Flickr Applications with PHP

Building Flickr Applications using PHPPHP, one of the most popular server side scripting languages has become the de facto standard in developing many of the high traffic websites around the world. Not surprisingly, many projects have grown around this language which aids the web developer to integrate more and more third party products by way of maps, imaging applications and more into the website. Flickr is one of the most popular photo sharing web application which heralded the dawn of the Web 2.0. It allows one to easily upload, manage and share photos online with others. And Yahoo (the current owners of Flickr) have released a set of open APIs which allow any web developer to seamlessly integrate Flickr on their websites.

The book "Building Flickr Applications with PHP" authored by Rob Kunkle and Andrew Morton is a unique book which aims to lessen the learning curve associated with developing Flickr applications with PHP. The book, all of 9 chapters spanning around 200 pages is targeted at photographers, bloggers and web designers who would like to make greater use of the photos they have stored in their Flickr account.

To integrate Flickr on ones website, it is imperative to first have a good feel of the Flickr interface. In the first two chapters, the authors give a sound understanding of the Flickr interface. We get to know about different ways by which it is possible to categorize the photos and understand the Flickr terminology such as tags, sets and groups, ways in which you can post Flickr photos on to your blog right from the Flickr interface and more. These two chapters give a sound understanding of the core functionality of Flickr.

Phlickr is an open source PHP 5 library which acts as an interface between the PHP based website and the Yahoo Flickr API. This book uses this library to integrate Flickr with ones websites. The third chapter of this book walks one through the installation and configuration of Apache web server, PHP and Phlickr API on ones machine.

In the fourth chapter the authors give a brief run down of the essential PHP syntax which will help a PHP beginner to brush up his knowledge in the language.

It is only from the 5th chapter onwards that one is introduced to the meat of the topic. In this chapter, with the aid of example code, the authors explain how to display a Flickr photo and all its properties on ones website coded using PHP. This chapter also introduces two Phlickr library classes Phlickr_Photo and Phlickr_AuthedPhoto which play an important role in displaying the photos from Flickr website.

The next chapter titled "Getting Organized: Working with Flickr Photo Sets" is an extension of the previous chapter where in one gets to know how to organize the photos using sets and groups. What is interesting is that each section in this chapter is a how to do it section which contain the desired PHP code with an explanation of how it works.

Chapter 7 reveals another dimension to this whole project by introducing the simpleXML - the PHP 5 interface which allows one to easily search through and find data from an XML file. This chapter also explains how to access the Flickr tags, search through them, and even assign new tags while uploading the photos to the Flickr website all this using PHP.

RSS feeds and syndication form the basis for the 8th chapter. RSS is a lightweight XML schema which allows websites to present structured data about content they have posted. This chapter analyzes the different types of RSS such as the ver 1.0, 2.0 and the atom XML.

The last chapter solves tasks such as batch adding of photos to Flickr account, searching and displaying the group photos, showing a random photo from a particular group, displaying the RSS data in a user readable format, showing the latest photos from a group and so on.

Book Specifications
Name : Building Flickr Applications with PHP
ISBN : 1-59059-612-9
Authors : Rob Kunkle & Andrew Morton
Publishers : Apress
No. of Pages: 200
Price : Check the latest price at Amazon Store or compare prices.
Rating: Very Good
Category: Beginner to advanced. Good buy for bloggers and personal website owners who would like to integrate their Flickr photos seamlessly on to their websites.

This is a nice book which explains how to integrate one of the most popular Web 2.0 successes - namely Flickr - seamlessly into ones website using PHP. Even though the book is relatively small and concentrates on a niche topic, the authors have done a pretty good job of walking through all the necessary steps in a precise and clear manner.

Sunday 22 October 2006

A brief look at Slackware 11.0

When you hear the name Slackware, you are at once transported to a world where Linux users feel more at home in setting the configurations by editing ordinary text files. In fact the credo of Slackware is to keep it as simple as possible. In popular speak, it is known by the acronym KISS (Keep It Simple Stupid). When I use the word simple, I mean simple in relation to a person who is already well versed in the use of Linux. So you won't find any Slackware specific memory hogging GUI front-ends to set up simple day to day configuration parameters. Apart from the ones provided by KDE - the default desktop of Slackware, you will not find any GUI helper apps as are common in other popular Linux distributions.

Another aspect of Slackware which has amazed me is that the whole project is the outcome of the efforts of one person - Patrick Volkerding. He has designed Slackware around the idea that the system should be a complete installation kept updated with any official patches. I couldn't help thinking that perhaps Patrick had been an avid user of one of the BSDs before he started the Slackware project and had been swayed enough to make Slackware as similar to the BSD which also consider the kernel together with the tools bundled with it as a single entity.

The latest version of Slackware is ver 11.0 which was released a couple of weeks back. Blame it on my internet connection, but in the past, I have had difficulties in downloading the ISOs of Slackware but this time round, I was successful in downloading and burning Slackware 11.0 on to the CDs. The whole Slackware distribution will fit into 3 CDs. If you do not care about X, then you can easily manage with just the first CD which contain a collection of Linux kernels and all the command line tools. But if you want to install KDE, you will need the second one. The third CD contain miscellaneous packages such as the language packs. It is prudent to download all the three CDs even though the installer bundled with Slackware will allow you to pick and choose between packages.

And while talking about the installer, Slackware comes bundled with a text based installer which is very similar to that found in FreeBSD. That means, you have a master menu which contain sub-menus to execute different functions. Such as a menu for partitioning the hard disk, a menu to format the disk, one for setting up and turning on swap, one to start the copying of packages to the hard disk and so on. And once all the tasks are completed, you are placed back into the master menu. The whole process is quite intuitive for anybody who has prior experience in installing an OS using a text installer. Of course unlike other Linux distributions, when you boot the computer using the first CD, you are put into a root shell and you have to type the command 'setup' to initiate the Slackware installation process.

I chose the full install since I had with me all the 3 CDs and within a little time all the packages were installed on one of the partitions on my machine which took around 4.0 GB space. Oh yeah, Slackware still bundles with it the LILO boot loader when most Linux distributions have graduated to the more user friendly Grub. Since I already had Grub installed in the MBR on my machine, I chose to edit the grub menu to include Slackware instead. During the installation, Slackware correctly detected the Windows NTFS and Fat32 partitions on my drive and prompted me for the path where I wanted it to be mounted.

The default kernel in Slackware is still the battle worn time tested 2.4 series (2.4.33.3) but you can also opt for the latest 2.6 (2.6.17.13) version of kernel at the time of installation by entering the command 'huge26.s' at the boot prompt.

As far as window managers are concerned, Slackware bundles with it a total of seven window managers which includes KDE 3.5.4, Xfce 4.2.3.2, Fluxbox, Blackbox, WindowMaker, Fvwm2 and Twm. But if you are a die hard Gnome user, then you will be disappointed though because Pat has long since discarded Gnome for its perceived difficulty in maintenance.

Slackware follows the BSD style init scripts
One note worthy fact about Slackware is its adoption of the BSD style init scripts over the System V init scripts more commonly embraced by the rest of the Linux distributions. What it translates for the Slackware user is simplicity in enabling and disabling services. You do not have to dirty your hands by changing the sym-links as you do in System V init scripts.

For example, say I want to enable the firewall in Slackware when it is booting up. All I have to do is move to the /etc/rc.d/ directory and set the executable bit of the file rc.firewall. And the next time Slackware boots up it will have the firewall up and running. On a similar note if you want to disable the firewall, then just unset the executable bit of the file rc.firewall. But that is not all. The contents of the rc.firewall file are in the same format as the iptables rules you enter in the command line which makes it quite easy to maintain in the long run. There is no iptables-save or iptables-restore for you.

Similarly for loading any extra drivers in the Linux kernel, you enter the module name in the liberally commented rc.modules file. For each service that is available in the system, there is a corresponding rc.<servicename> bash script in the /etc/rc.d/ directory and depending upon whether the executable bits are set or unset, Slackware chooses to start/stop the service during system startup.

Useful configuration scripts in Slackware
Earlier I had mentioned the obvious lack of any Slackware specific GUI front-ends. Well, it was more of a white lie ;-). Even though there are no GUI front-ends for configuration, there are a collection of curses based programs (scripts) which you can use to set up and configure a variety of features in Slackware including setting up networking. Some of them that I am aware of are as follows:
  • netconfig - A menu based program that will help in configuring your network.
  • pppsetup - A menu based program that helps in connecting to the Internet via a dial up modem.
  • xwmconfig - Choose your default window manager.
  • liloconfig - Setup and install LiLO to the boot drive.
  • xorgcfg - Setup the configuration for X Windows. It will automatically generate the xorg.conf file which is saved in the /etc/X11/ directory.
  • alsaconf - Automatically detects the sound cards and configures the sound.
More over, Slackware specific tools like Swaret, Slapt-get - a clone of apt-get and Slackupdate make it easy to keep the system updated with the latest security patches or even upgrade the entire system to a new version.

I have been using Slackware for a couple of weeks now and I am definitely impressed with the ease with which you can configure it. And I have started to really like this distribution. I did face some issues once I finished installing Slackware. Like I had to modify the xorg.conf file to get my mouse wheel to work also I had to run alsaconf to get sound to work properly. But nothing serious which warranted any drastic action.

Even though Slackware does not bundle Gnome with it, there is a separate project called Dropline Gnome which provide Slackware specific packages of the latest version of Gnome. Another site which caters to the Slackware crowd is linuxpackages.net which is a repository of Slackware packages.

Slackware is one of the oldest Linux distributions out there. And over the years, it has consistently kept pace with the changes. All the software bundled with Slackware 11.0 is the latest version - for instance Vim 7.0 is included, so is Firefox 1.5.0.7. And this is a remarkable feat since it is a project borne off the efforts of one man - Patrick Volkerding.

Saturday 21 October 2006

Interesting tips to designing effective websites

Anybody who runs a website will be faced at one time or another to redesign his site. I have myself tried my hand at redesigning this site with varying degrees of success - though you can plainly see that there is a lot of scope for improvement.

But does designing websites require following a series of pre-charted steps ? Or is it a process which require little if any planning - one where you just jump in and start modifying the code ?

It appears that most, beautifully designed websites are the result of careful planning and forethought. Designing websites can be divided into 9 separate steps. Them being :
  1. Know what you're doing.
  2. Know what the site needs to do.
  3. Know what the site's visitors want.
  4. Get a good picture of the personality and style of the web site.
  5. Sketch out highly successful scenarios.
  6. Organise views into a site map.
  7. Sketch the essential features & look - This is the time you use a graphics software such as Gimp. But using only pen and paper is also equally effective.
  8. Map your visitors' attention.
  9. Arrange the visual elements to work together.
You can read the details of each step at this well written article at Web design from scratch - a beautiful site with good articles pertaining to web design.

And if you are wondering which is a good book to pick up the essential skills in XHTML, CSS and Javascript which are pre-requisites for mastering the art of web design - I would highly recommend you check out the book Web Design in a Nutshell which is well into its third edition having sold over 200,000 copies so far.

Wednesday 18 October 2006

Adobe Flash Player 9.0 Beta version for GNU/Linux

Flash - the technology which allows one to build rich multimedia intensive, user interactive websites and applications was developed by the erstwile Macromedia - now acquired by Adobe. Flash is famed for its flexibility and ease of use in creating multimedia intensive web applications while keeping the size of the resulting application nominal. Lets face it. There is no way we can boycott Flash based websites effectively without missing atleast some of the vivacity of the web. Till recently, GNU/Linux users were forced to put up with support for Flash player ver 7.0. This when many websites and applications that were developed using Flash requiring Flash player 8.0 for optimal viewing. The end result being we Linux users being shut out from viewing these sites.

Now things have changed though because Adobe has (partly) delivered on its promise of supporting Linux by releasing the latest version of Flash player (ver 9.0) for Linux along side that for Windows and Mac OSX platform. The version that is released is still in the beta stage. Neverthless, this is a step in the right direction atleast for Adobe and the multimedia loving Linux users as for the former, it is a good PR exercise and for the latter, it is better access to flash based websites.

The flash support for Firefox and other web browsers on Linux hinges on just one file which goes by the name "libflashplayer.so". Installing the new flash player ver 9.0 is a simple affair and involves downloading the archive (tar.gz) from the Adobe labs website and extracting the libflashplayer.so file. Then moving the file into the plugins folder of the particular web browser.

You can do it in two ways. One is installing it globally by copying the file into the directory /usr/lib/firefox-1.x.x.x/plugins/ which requires root access. Or choosing to install locally by copying the file into the .mozilla/plugins folder in ones home directory (assuming it is for Firefox). Either way, it is mandatory to restart Firefox to make the changes take effect. One note though, if you choose to install it globally and you already have Flash player ver 7.0 plugin installed locally, then Firefox will use the ver 7.0 player as all local per user settings take precedence over the global settings in Linux.

Even though the player has been released as beta, I found it to work without a hitch and display all those sites which I missed out previously because of lack of the right version of Flash player.

Update (25th Oct 2006): As of now there is no 64 bit version of Adobe's flash player for Linux. But it is possible to run the 32-bit version in a 64-bit machine as this post on Adobe's blog indicates.

Sunday 15 October 2006

Xen - A GPLed Virtualisation Technology for Linux

Linux had always lacked a Open Source virtualisation technology in the same league as Solaris containers or commercial product like Vmware. That was until Xen came into the picture. Xen is an open source virtual machine monitor for x86 that supports execution of multiple guest operating systems.


Xen is released under the GPL and can easily be used to run virtually, OSes as diverse as different Linux distributions, BSD's and even windowsXP (though windows port is not available because of licensing restrictions). Virtualisation technologies are nothing new, what with Vmware, Usermode Linux, Win4Lin and others available. But Xen is relevant here because of the support for it from Redhat, GPL-ed licence and also its active development.


Recently, I downloaded the Xen Live CD ISO image (503 MB) from their website and burned it on to a CD in order to give it a trial run. What follows below are my experiences in trying out this very promising virtualisation technology.

The Xen Live CD comes with two images, them being :


Debian Etch and CentOS 4.1 . When I booted using the Live CD, I was presented with the GRUB boot loader which gave me a choice of booting two OSes. Them being Debian Etch and CentOS 4.1. I selected the Debian Etch and the booting proceeded without any problem. It took around 3 minutes to present the GUI login screen. Xen live CD uses GDM as the display manager and loads the Xfce desktop.


When the gdm (Gnome display manager) was fully loaded, you are presented with the login screen where you are prompted to log in as user root and password xensource. Once you are logged in, you are presented with two open applications - one an Xterminal and another giving a real time data of the virtual machine status (see figure below).


Fig: Xen Desktop (Debian etch)


Next I decided to create a virtual machine for the CentOS Linux distribution in side the Debian etch distribution. For achieving this, you have a very user friendly command line utility called xm. I created the CentOS image as follows:


# xm create -c /root/centos-conf name=centos_1
It gave an error saying that it couldn't find enough memory to load CentOS and that it needed atleast 96 MB for the same when there was only 17 MB available. The machine on which I tested Xen is a Pentium IV 256 MB RAM machine. At this point I realised that almost all the memory on my machine was allocated to Debian Etch OS.
Fig: The virtual machine monitor


I figured out that one can reduce amount of memory allocated to the virtual OSes by using the same xm utility. For that you have to find the domain id of the virtual OS whose memory allocation you want to change.
# xm domid Debian_os1
0
The above command listed the domain id of the debian etch virtual os. Then I reduced the memory allocation for the debian etch OS to 98 MB as follows :
# xm  mem-set 0 98
The above command reduces the memory allocated to the domain id 0 to 98 MB. Thus I succeeded in reducing the memory allocated to the debian etch os to just 98 MB. Which meant atleast 100 MB memory was freed in the process.
Fig: Shows reduced memory highlighted in red.

After that I again tried creating the CentOS virtual OS

# xm create -c /root/centos-conf name=centos_1
Now the previous low memory error was rectified but centOS started in the paused state and I set about figuring out how to unpause it - which was quite simple as finding the domain id of the centos_1 image and then unpausing it using the universal xm command.
# xm domid centos_1
2
# xm unpause 2
That done, eventually I got the CentOS login screen (See figure below).


Fig: CentOS login screen inside a VNC window


Of course, if I have enough memory, I can start any number of these virtual OSes following the above methods. Xen uses VNC to display the virtual OS. So if you are starting say 10 virtual OSes, each will have its own VNC window. You can even start Xen on a server say, and then access a complete independent OS using a VNC client from a remote machine.

Uses of Xen Virtualisation

Here are a couple of ways I figured out how Xen could be put to good use.
  1. If you are a student interested in getting hands on networking skills, then you can set up your own virtual networking lab on your home computer provided you have at least 1 GB RAM. Using three or more virtual OSes, you can set up a virtual network lab and try out skills like routing, bridging , setting up gateways, running firewalls, subnetting your network and more all in the safe confines of a virtual environment.
  2. If you are a frequent netizen, then you must be aware of the rumor many months back, of a certain very popular public limited company (guess who?) slated to bring out its own OS based on Linux. Well, if such a project were to kick off, then it will most probably be using virtualisation technology like Xen. Using Xen, each user can be given his own copy of a OS complete with root privileges. And since Xen is using VNC to display the desktop, it is most suitable for a network OS. Of course pulling off a massive project of this kind would require humongous amount of memory (to the tune of Terra bytes?). But a well heeled company will have all the resources to successfully start such a project.
  3. Kernel developers and debugging specialists in the kernel space will find Xen really useful because they could compile code and try out things on the virtual OS that has a good probability of trashing the OS without affecting the parent OS.
  4. Even application developers on the Linux platform can test their applications on different Linux distributions at the same time by running copies of the distributions simultaneously using Xen on their PC.
Current drawbacks of Xen Virtualisation

  1. Needs to enable virtualisation in the parent Linux kernel which at this time requires recompiling a kernel from source. But it is bound to change when Intel supports virtualisation at the hardware level on more of its CPUs.
  2. Needs a good amount of memory for it to be of any use to anybody. I would recommend atleast 1 GB memory even though with a little bit of tweaking like I did above, you might be able to use it with less than 256 MB RAM. Though its practical use will be limited.
  3. It is a relatively new technology (when compared to commercial products like vmware).
Note to readers: This is an article which I had contributed to Linux Weekly News many months back. You can find the original article here.

Thursday 12 October 2006

News: PC-BSD gets acquired by iXsystems

PC-BSD - the FreeBSD clone which was widely touted as the BSD for Desktop users have a new owner now. It has been acquired by iXsystems who are an enterprise-class hardware solution provider. In a previous article I had written my experiences in installing and using PC-BSD. One of its USPs is the click and install method of installing software akin to that found in Windows. Yet another feature is its ease of installation via a graphical installer just like many of its Linux counterparts. It seems with this acquisition which also involves the founder of PC-BSD Kris Moore who will be working for iXsystems, PC-BSD will be trying its luck in the workstation,server and laptops market under its new owner.

Kris has clarified that he will now be working full time on the PC-BSD project and it is going to remain free as always. So in many ways things haven't changed as far as the end user is concerned. Apart from the fact that now PC-BSD is in a position to provide professional support to those who need it through iXsystems.

Wednesday 11 October 2006

A first look at the Linux friendly Google Docs & Spreadsheets project

All netizens would by now be aware of Google re-launching its online Spreadsheet and Writely Document products as an integrated product at docs.google.com. This is a first look at what is in store for people who intend to use this Google product. What is interesting is that Google is on a fast trot to integrate all its online services by linking it with a single Google account and this latest offering is the result of such an integration. Naturally, you need a Google account (read Gmail account) to log in and use Google docs and spreadsheets.

Google Docs - giving the competition a run for its money
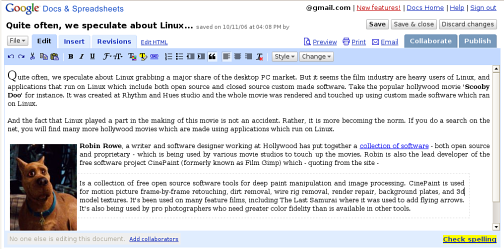
Once I logged in using my Gmail id, I was pleasantly surprised at the rich interface which was loaded in my web browser. The editor took some time to load the very first time - around a minute or so but succeeding loads were quite fast. I found almost all the features that are expected in a word processor here but without the clutter and excesses you find in Ms Word.

Fig: Document as viewed within Google Docs

In fact, the learning curve for any person who has used Ms-Word at one time or the other is practically nil as you get similar buttons and options in the tool bar and all it takes is to start typing and editing the document. As of now, Google allows you to embed an image of size not more than 2 MB but the document editor provides a lot of flexibility in placing the image within the document in relation to the flow of the paragraph.

Insert comments
Another feature which really attracted me was the possibility of embedding comments within the document. The background color of the comments can be changed and Google doc automatically inserts the date and time at which the comment was made.

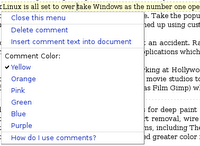
Fig: Change the color of the comments

Insert Bookmarks
It is possible to provide links to different places within the document itself. Google calls these internal links bookmarks and it can aid in the creation of an index or table of contents. For example, each section in a document can be bookmarked and when you create a TOC, all the bookmarked sections will be reflected in the table.

Fig: Tag a document

Insert special characters
Sometimes it becomes necessary to include alternate characters other than those found in English language, such as when writing the name of a Norwegian for instance. Google docs provides a separate dialog which lists all the special characters that one may find useful. And clicking on a special character will insert it in the document that is being edited.

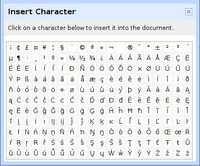
Fig: Special character dialog

Font support
The number of fonts included with the Google docs though not as many as those found in MS Word are still significant. All the most commonly used fonts such as Arial,Georgia, Tahoma and Times New Roman are included though.

Revisions
This is a feature which is god send for all those people who edit and re-edit a document many times over before they are satisfied with the document. Google has made it quite easy by making sure that all the changes are logged. This makes it possible to go back in time to a document view before the mistake was made. Or even revert back to the final edit. Also it is possible to compare two changes to the document side by side.

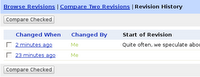
Fig: Revisions page allows one to move back and forth in time of the document

Collaboration
One of the most exciting feature of Google docs is that it allows a group of people separated across the net to virtually get together and collaborate on a document in real time. This is a feature which will gladden the hearts of corporate and business teams. Assuming that the document in question is not confidential, they can easily bring together a team spanning the net and work together on a document. And Google docs provides two set of powers to the users. That is a 'collaborator' and a 'viewer'. Viewers can see the same document that collaborators do but cannot edit it. Where as collaborators may edit the document and invite more collaborators and viewers. What is interesting is that Google docs even provides an RSS feed of the document changes which can be passed around.

Share your documents in three different ways
Google provides three ways of sharing your document with others. They are as follows:
  1. Via Email - Email the document to others using your Gmail account which is integrated with Google docs. As the logging in is now centralised in that your email id is used to log on to all the Google services, this is understood.
  2. Publish it as a web page - Google allows you to publish your document to the internet, where everyone will be able to access and view it online. The document will be assigned a unique address (URL) on Google.com that you can send to your friends and colleagues.
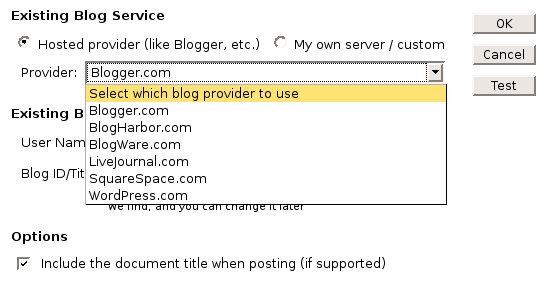
  3. Post to Blog - This is the most interesting one. It is possible to post your document to your personal blog. At present Google docs supports the following hosted blog services : Blogger.com, Blogharbor.com, Blogware.com, Wordpress.com, Livejournal and SquareSpace. But if you host your own website, then it allows you to publish the document to your personal blog in which case you have to select the "my own/ Custom server" choice (see figure below).
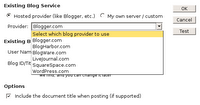
Fig: Post to a blog dialog

Export the documents in a number of file formats
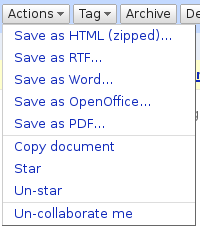
It is possible to export the documents residing in Google docs to a variety of file formats such as RTF, PDF, Html, MS Word and OpenOffice format. But I found that the PDF format needs some more work as the resulting PDF distorts the aspect ratio of the images that are embedded in the document.

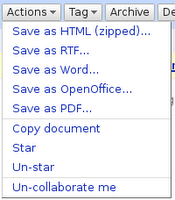
Fig: Export documents in a variety of file formats

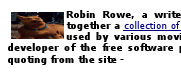
Fig: The save as PDF feature needs further improvement.

I have been using the erstwhile Writely for creating and editing my documents online for quite some time now. And Writely is no doubt an excellent product. By integrating it with other Google services, providing a consistent interface and by including additional features, Google has enhanced the value of this product by a great extent.

Google Spreadsheets
This is the sister product of Google Docs. And now it is possible to edit a spreadsheet while logged into the single Google account. The first time you start editing a new spreadsheet, Google will show a warning that the spreadsheet is unsaved and prompt you to turn on auto saving - for which you have to first save it once by giving it a name.

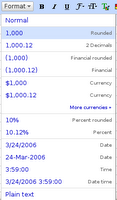
Fig: Numbers format drop down menu

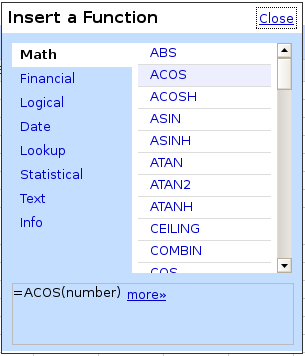
Google spreadsheet comes with a rich set of formulas. Inserting formulas in the spreadsheet is similar to what you do in any other spreadsheet product which is press the equals (=) sign and enter the formula. But it is also possible to insert a formula using the unique formula dialog (See figure).

Fig: Formula dialog

Fig: Inserting a formula inside a cell is similar to that in Excel

But one feature that Google spreadsheet lacks is in the creation of a chart using the values included in the cells. Also it is as of now not possible to embed a spreadsheet into a Google document and vice versa.

Google even allows you to upload your documents and it imports them into your online Google docs account. But as of now you are limited to a max document size of 500kb. You can upload files of type HTML, text file, MS Word, Rich Text (RTF), Open Document Text (ODT) and Star Office. As far as spreadsheets are concerned, three file formats are supported - them being CSV (Comma separated value), Microsoft Excel and Open Document spreadsheet files.

Oh yeah, Google docs also provide a unique email with each account something like De-dd3gf2hf-Ac648m5h@prod.writely.com which is different for every user of Google docs and is not the same as the Gmail id. By sending the documents to this email as an attachment or as the body of the email, it is possible to store the documents in the Google docs account.

All in all, this is a great venture by Google to provide online equivalents of the most popular office applications namely word processors and spreadsheets. It remains to be seen how this will affect the fortunes of Microsoft considering that MS-Office is one of its flag ship products which pulls in a significant share of its net revenue.

As of now those corporates for whom confidentiality is a decisive factor might stick to MS Office or similar products as they may be squeamish about their documents residing in a Google server. But for the rest of us, this move by Google is a great leap forward as it has successfully de-linked the productivity applications from the Operating System and it is possible to view, collaborate and edit ones documents from within any OS - be it Windows, Linux, Mac OSX or any other as long as you have access to a web browser.
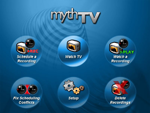
Tuesday 10 October 2006

The unique relationship between Hollywood Movies and Linux

Quite often, we speculate about Linux grabbing a major share of the desktop PC market. But it seems the film industry are heavy users of Linux, and applications that run on Linux which include both open source and closed source custom made software. Take the popular hollywood movie 'Scooby Doo' for instance. It was created at Rhythm and Hues studio and the whole movie was rendered and touched up using custom made software which ran on Linux.

And the fact that Linux played a part in the making of this movie is not an accident. Rather, it is more becoming the norm. If you do a search on the net, you will find many more hollywood movies which are made using applications which run on Linux.


Robin Rowe, a writer and software designer working at Hollywood has put together a collection of software - both open source and proprietary - which is being used by various movie studios to touch up the movies. Robin is also the lead developer of the free software project CinePaint (formerly known as Film Gimp) which - quoting from the site - is a collection of free open source software tools for deep paint manipulation and image processing. CinePaint is used for motion picture frame-by-frame retouching, dirt removal, wire rig removal, render repair, background plates, and 3d model textures. It's been used on many feature films, including The Last Samurai where it was used to add flying arrows. It's also being used by pro photographers who need greater color fidelity than is available in other tools.

Monday 9 October 2006

Demo of the inner working of a Hard Drive

When ever I get to take apart a gadget and look inside, I can't help but stare in wonder at its working. This is especially true when the said device consists of some moving parts. Sometimes I can't help thinking that we humans should pick up a thing or two from the gadgets - especially the team work bit. All the small pieces of the gadget come together and work as a single entity - each doing its own alloted work efficiently - thus acomplishing complex tasks.

Josua Marius has videoed the inside of a hard disk and demonstrates how the lever reacts when one modifies the data on the hard disk. The whole process looks really interesting.


Friday 6 October 2006

.htaccess Tips and Tricks

Apache is one of the most popular web server which is stable and which scales very well. This web server which has been released under a free licence has the honor of powering many of the very high traffic sites, not to speak of the 100s of 1000s of ordinary websites dotting the net landscape.

Usually, when you host a website on a shared server, you are not provided any rights or access to modify the main configuration file (http.conf or apache2.conf depending on the OS on which the webserver runs) of the apache webserver. So you are severely constrained about changing the parameters of the web server (called server directives) and have to rely exclusively on the systems administrator manning the remote server.

This is where the .htaccess file has its use. By creating this hidden file in the root folder (or any sub folder) of your website, it is possible to set/unset almost all the server directives that can be set in the apache main configuration file. And these changes will take effect only for the root folder in which you created the file and its sub folders. Thus .htaccess file plays an important role in providing fine-grained control to an individual managing a website without giving blanket control of the web server.

For example, you can effectively use .htaccess file to deny access to everyone for certain folders residing withing your website directory. Or you can password protect your directory and allow access only to authorised people. But one of the most powerful and popular trick is to rewrite a particular URL using regular expressions. This can be useful if for instance, you have relocated some of the web content to another location thus changing the path of the file. So instead of giving a visitor an error page, you can write a couple of lines in a .htaccess file which will redirect the user to the new location of the web page.

Today, I came across this two part series (Part I and Part II) titled '.htaccess tips and tricks' which explains many of the tasks one can achieve using the .htaccess file which makes an informative read.

Wednesday 4 October 2006

Here is why the anti-piracy technology being in-build in Windows Vista could be good for GNU/Linux

I recently read a news item which disclosed that Microsoft plans to incorporate anti-piracy technology into the yet to be released Vista OS. This set me thinking. What does this hold for GNU/Linux? Put differently, could this move by Microsoft have any positive effect on the popularity of GNU/Linux ?

Before we jump into talking about Linux and what it stands to gain from this, let us look at the present scenario as far as Windows use is concerned. It is a well known fact that around 70 % (I suspect even more) of the Windows OS that is run on PCs worldwide is pirated. Which means only 30 % of the people who use Windows actually pay for it and use a genuine licenced copy. This trend is more prevalent in third world countries where there is a mind set among the majority of computer literate people which equates (any) software with freeness as in free beer.

It is so easy to walk into a shop selling computers and request them for a copy of any of the Windows OS and you can get it for the cost of a blank CD - around US $1. Of course with Windows XP it is not possible to install the service pack 2 and above if it is a pirated copy - but then do people really bother to install the service packs if the only alternative is to shell out money and buy a genuine licence ? I really doubt it.

For example, in India, software piracy is so rampant and ingrained in the society that the top branded computer manufacturers are forced to sell computers without an OS or with Linux pre-installed to compete with the assembled PC sector. The various PC ads in newspapers are proof enough for this.

Now when Microsoft finally release Vista with inbuilt anti-piracy technology, if what has been disclosed is true and there is no option other than to register the copy at Microsoft website in order to fully enable it, then it will open up the flood gates for alternatives to Vista. For one, people - ie those who shy away from shelling money for the software - will genuinely take interest in installing and using GNU/Linux.

Assembled PC manufacturers (who are a sizable group) will go the extra length in convincing their potential customers to buy a PC pre-installed with Linux and will hopefully impress upon them the good aspects of GNU/Linux - after all they also have to look at their bottom lines and at the same time be able to provide a PC at a more competitive rate than the branded PCs. And once these people start using GNU/Linux, they will realise how much value this remarkable OS and the applications installed in it can provide when compared to a similar proprietary solution which costs bundles of money.

Of course, this may not in any way cause a dent in the Microsoft's kitty; if anything, this move by Microsoft will only increase its revenue. But then a reduction in piracy will be a win-win situation for all parties concerned as for Microsoft, it can be happy that all who use its OS is actually buying a genuine licenced copy and for Free software and GNU/Linux in particular, it is still a win because it will be able to attract those sizable group of people who are not willing to shell out money for software or OS.

Monday 2 October 2006

A cool visual way of understanding RAID

RAID stands for Redundant Array of Inexpensive Disks, is a process of using multiple hard drives to replicate data. There are different kinds of Raids such as :
Raid 0 stripped set, Raid 1 mirrored set, Raid 5 stripped set with parity and so on. (Source: Wikipedia).

Here is a very cool way of understanding RAID as explained by an enterprising mind. And when I say cool, I mean it.

Sunday 1 October 2006

Steps to get Audio to work in Debian Etch

Debian Etch is a very good Linux distribution. It has all the latest versions of software - even more recent than those found in Ubuntu Dapper (though that is bound to change once Ubuntu releases its next version) and also a pretty GUI installer. Recently when I downloaded and installed the latest version of Debian Etch Beta 3, every thing went quite smoothly - Etch correctly detected all the hardware in my machine and I was booted into Linux in no time.

But... I ran into a problem. I have on-board sound on my Intel motherboard as I found out running the following command :
#lspci|grep Multimedia
00:1f.5 Multimedia audio controller: Intel Corporation 82801BA/BAM AC'97 Audio (rev 05)
And the correct driver module 'snd_intel8x0' for this on-board sound was already loaded as was seen by running lsmod.
#lsmod
Module Size Used by
snd_intel8x0 29436 0
snd_ac97_codec 82784 1 snd_intel8x0
snd_ac97_bus 2048 1 snd_ac97_codec
snd_pcm_oss 43520 0
snd_mixer_oss 15584 1 snd_pcm_oss
snd_pcm 74408 3 snd_intel8x0,snd_ac97_codec,snd_pcm_oss
snd_timer 20292 1 snd_pcm
snd 46080 6 snd_intel8x0,snd_ac97_codec,snd_pcm_oss,snd_mixer_oss,snd_pcm,snd_timer
soundcore 8672 1 snd
snd_page_alloc 9800 2 snd_intel8x0,snd_pcm
...
Then I checked the volume control and I found it to be turned to full volume - so no problem there either. It seems, Debian requires the package libesd-alsa0 which was missing on my machine. This may be because I had installed a standard system install and then later downloaded and installed the desired packages thus avoiding unnecessary bloat. And I might have missed installing some of the necessary packages.

Anyway, once I downloaded the libesd-alsa0 package and installed it, I ran the alsaconf script which automatically removed the loaded sound drivers, detected the sound card, reloaded the relevant drivers and finally, reconfigured the sound to work correctly. And shortly after that, I started relishing the heavenly tunes emanating from the speaker.

So here is the deal to get sound working correctly in Debian Etch. That is, regardless of the version of the kernel, you need to have alsa-base, alsa-utils and libesd-alsa0 packages installed. You will also have to use the alsaconf command to configure and load the necessary sound modules.

While configuring, alsaconf will ask whether to modify the following two files:
/etc/modprobe.d/sound & /etc/modprobe.conf - if they are present. These files are used to tweak the settings of the sound card by passing additional parameters. Usually you won't have them on the system.

After the sound card is configured, it will load the ALSA sound driver and use amixer to raise the default volumes. It is also possible to change the volume later via a mixer program such as alsamixer or gamix.

Considering the number of hoops I had to loop in getting sound to work in Linux a couple of years back, this process is a piece of cake. In fact, I believe, if I had installed a default Desktop Environment, I wouldn't even have had to go through the above process. Anyway, it is nice to know what to do when things go wrong.