

Monday, 30 May 2005
Mutt - the versatile email client
This summary is not available. Please
click here to view the post.
Sunday, 29 May 2005
Using fetchmail to download emails from your Gmail account
In Linux there is a wonderful program called fetchmail. This program is used to connect to a remote mail server, login to your email account and retrieve new mails from your inbox. Here I will explain how you can retrieve mails from your Gmail account using fetchmail.
First you need the necessary data like the pop server address, the port number and so on of the remote mail server. For Gmail, the values are as follows:
Incoming mail (POP3) server : pop.gmail.comNow check if you have fetchmail installed in your machine :
Port No: 995
Use SSL : YES
Outgoing mail (SMTP) server : smtp.gmail.com
Use authentication : YES
Use STARTTLS (SSL) : YES
Ports : 465 or 587
Account Name : gmail username (including @gmail.com)
Email address : username@gmail.com
Password : Your gmail password.
$ rpm -q fetchmail
fetchmail-6.2.5-2
If you don't have fetchmail installed, now is the right time to install it. I am not going to go into the details of installing fetchmail here. Usually in majority of the Linux distributions, you will have fetchmail installed by default.
Assuming you have fetchmail installed on your computer, create a file by name .fetchmailrc in your home directory by issuing the following commands :
$ cd
$ touch .fetchmailrc$ chmod 710 .fetchmailrc#File : .fetchmailrc
set postmaster "local_user"
poll pop.gmail.com with proto POP3 and options no dns
user 'username@gmail.com' is 'local_user' here options sslIn the above listing, we set the the postmaster to the name of the local user - it could be either 'root' or your local user account name. It means that any undelivered email send to postmaster will be redirected to local_user. The next line asks fetchmail to connect to the gmail account using ssl and to retrieve the mails in username@gmail.com account and store it in the spool of the local_user . 'no dns' specifies that it is a dial-up account and your machine is allocated a dynamic IP address.
Now when ever you want to retrieve email, first connect to the internet and then just open a terminal , and type :
$ fetchmail -v --keepThis will ask for your Gmail account password and then fetch your mail from the server and store it in your machine's mail spool. now you can use any email client - mutt, pine etc - to read your mail offline.
Note : There are a lot of options that you can use in fetchmail. To know more about the options, check the man page of fetchmail.
Friday, 27 May 2005
Scheduling tasks in Linux using Cron
Cron is a daemon which schedules recurring jobs to be executed at a predefined time and date. It is very easy to schedule a job to be run at a particular time using cron. Cron daemon is typically started at boot time and runs continuously in the background. Cron table files (crontabs) are stored in the /var/spool/cron directory, which is not accessible by non-privileged users. In order to access the current cron table, the crontab command is used as follows :
$ crontab -e The above command will load the user's crontab in an editor - usually 'vi '- for editing by the user. You can set a different editor by setting the $EDITOR variable to a different value.
The crontab file contains 6 fields which are as follows :Min Hours day-of-month month day-of-week command-to-runAnd the values of these fields can take the following form:
Min - 0-59
Hours - 0-23
day of month - 1-31
month - 1-12 or Jan-Dec
day of week - 0-7 or Sun-Sat
Fields in a crontab may be separated by any number of tabs or spaces. Multiple values may be separated by commas. And a '*' symbol in a field represent all valid values.
Suppose I am logged in as root and want to modify a crontab file of a particular user. Then I use the '-u' switch :
# crontab -u username -e$ crontab -l$ crontab -rUsing the two files, /etc/cron.allow and /etc/cron.deny, root can allow or restrict a user from using cron. This is how it works. If the file cron.allow exists and your username appears in it, you may use the crontab command. If the cron.allow file does not exist and the file cron.deny does, then you must not be listed in the cron.deny to use the crontab. If neither file exists, the default behavior is to allow all users to schedule jobs with cron.
System crontab files/etc/crontab - Master crontab file
/etc/cron.d/ - directory containing additional system crontab files.
The syntax of the system crontab file is slightly different from the user crontab file explained above. In the system crontab file, the sixth field is a username which will be used to execute the command in the seventh field.
Below is the listing of my system crontab file - /etc/crontab# File: /etc/crontab
SHELL=/bin/bash
PATH=/sbin:/bin:/usr/sbin:/usr/bin
MAILTO=root
HOME=/
# run-parts
01 * * * * root run-parts /etc/cron.hourly
02 4 * * * root run-parts /etc/cron.daily
22 4 * * 0 root run-parts /etc/cron.weekly
42 4 1 * * root run-parts /etc/cron.monthly
As seen above, run-parts is a shell script which takes one argument, a directory name, and invokes all of the programs in that directory. The directories cron.hourly, cron.daily, cron.weekly and cron.monthly contain executables which are run by the master crontab file /etc/crontab . Thus at 4:02 every morning, all of the executables in the /etc/cron.daily directory will be run as root.
If you view the /etc/cron.daily directory, you can see a lot of executables which are run daily at a predefined time as specified in the /etc/crontab file.
For example, look at the following script :/etc/cron.daily/tmpwatch - this script is used to clean old files out of specified directories. Useful for keeping the /tmp directory from filling up. Because it resides in the /etc/cron.daily/ directory, it is executed once daily by the system crontab file.
Tuesday, 24 May 2005
Linux installation on my new machine
Recently I brought a new PC. It is a Pentium IV 2 GHz, 256 MB DRAM machine with 40x12x48 CD-RW and a DVD-ROM, 40GB hard disk, On-board sound and genuine Intel motherboard. It is enclosed in a nice burnish silver colored casing with a stylish handle at the top which is helpful in moving the computer if I want to rearrange it. The computer has 5 USB 2.0 ports with one port at the front and four ports at the back of the casing. I did not buy a new monitor and decided to use the 14" (Samsung Samtron 40Bn) monitor from my previous PC - which by the way was an Intel Celeron 333MHz 98MB RAM machine. My new computer came with windows XP Professional pre-installed. So the first thing I did was install the latest version of Linux I had with me, which was Fedora Core 2. All things considered, I decided to dual-boot between WindowsXP and Linux.
Unlike my previous experience ( Read my previous posts - sound , mouse and modem issues ), this installation went smoothly.Fedora detected my on-board sound card - 82801BA/BAM AC'97 Audio - correctly and loaded the snd_intel8x0 module. Mouse was detected as a PS/2 scroll mouse and the installer even detected the optimal resolution of the monitor and configured X to start with the best resolution. As far as Internet is concerned, I got myself a (broadband ??) 128Kpbs Cable Internet connection and the modem was connected via an ethernet port.
The performance gains were incredible. It took less than 30 sec for my new machine to load KDE desktop from the time it was switched on; while it took forever on my Celeron 333MHz machine.
But the installation did have a few rough edges though. It correctly detected my video card as a NVIDIA GeForce 2MX. But when I tried playing Chromium BSU game in Linux, it was too slow - though I was able to play the game in windowsXP quite well. I found to my consternation that X was using a generic display driver.To get the full power of the graphics card, I had to configure X to use Nvidia drivers instead of the generic ones.
Overall, I am really satisfied with the way my new machine responds to Linux.
Configuring Linux to use NVIDIA graphics card
My new machine contains an NVIDIA GeForce2 MX/MX 400 graphics card with 64MB RAM. I had installed Fedora core 2 on my machine and even though it had detected the graphics card right, was using a generic driver - the result being choppy graphics especially when running software making use of OpenGL libraries. I visited the NVIDA website and found that Nvida does support Linux platform actively. In fact, there was a latest version of the driver for GeForce2 MX/MX 400 card available for download. I selected the type of graphics card and the platform from its website and started the download. There was only one file called NVIDIA-Linux-x86-1.0-7174-pkg1.run to download which was around 9 MB size.
After downloading the file, I logged in as 'root' and started the installation as follows:# sh NVIDIA-Linux-x86-1.0-7174-pkg1.run
IMPORTANT: Do not run the above command while in the GUI mode - ie while running X. Always run it while in run level 3 - ie: text console only mode. For starting Linux in console mode, modify a single line in the file /etc/inittab from:
id:5:initdefault:to
id:3:initdefault:
And then reboot your machine. There is an easier way though; which is to fire up a terminal and as root, enter the command:
# init 3to log in to runlevel 3 or console mode.
Coming back to our topic, the .run file is a self-extracting archive. When the NVIDIA-Linux-x86-1.0-7174-pkg1.run file is executed, it extracts the contents of the archive, and runs the contained `nvidia-installer` utility, which will walk you through installation of the NVIDIA driver.Once the installation starts, the installer will first check if it has a precompiled kernel interface for the kernel you are using. I have a 2.6 kernel which obviously had a precompiled kernel interface and so the installation went smoothly. But if it is otherwise, then the installer will check if there is one on the NVIDIA ftp site - provided you are connected to the Internet - and download it. If no matching precompiled kernel interface is found, the installer will compile the kernel interface for your machine.
NOTE: Foreseeing the latter eventuality, It is advisable to install the kernel source on your machine before starting the driver installation.
Once the installation is completed, the next step is to change the settings in the configuration file /etc/X11/xorg.conf of the X.org server to point to the nvidia driver. Below I have shown relevant section of my /etc/X11/xorg.conf file.
#File: /etc/X11/xorg.conf
...
Section "Module"
...
Load "glx"
# Load "dri" ---- Comment out this line
# Load "GLcore" ---- Comment out this line
...
EndSection
...
# portions cut for brevity
...
Section "Device"
Identifier "Videocard0"
Driver "nvidia"
# Driver "nv" ---- Comment out this line
VendorName "Videocard vendor"
BoardName "NVIDIA GeForce 2 MX (generic)"
EndSection
...
As seen above, I have shown those parts that needs to be changed for X to start using the nvidia drivers. First in the Module section comment out the lines Load "dri" and Load "GLcore" and make sure you have the line Load "glx". Next move to the Device section and comment out the line Driver "nv" (or Driver "vesa" ) and in its place insert the line Driver "nvidia" . This asks the X server to use nvidia drivers instead of nv or vesa drivers.
After making these changes, save and exit the /etc/X11/xorg.conf file. Now we can start the X server which will start using the newly installed nvidia drivers and make full use of the graphics card.
Note: If you have changed the runlevel to 3 by editing the /etc/inittab file as explained above, now is the right time to change it back to the original value. To move to runlevel 5 from the console, just type the following at the command prompt by logging in as root.
# init 5Epilogue
Once I restarted X using the newly installed nvidia driver, my system saw huge performance gains. I tried playing ChromiumBSU game and it ran very smoothly at around 50 fps. And most of the games using OpenGL like TuxRacer and Tuxkart started running as smooth as silk.Of course, games are not the only ones relying on a graphics card. There are a lot of programs (3ddesktop comes to my mind here) which rely on OpenGL which in turn requires a graphics card to harness its real power.
Sunday, 22 May 2005
Tip : Quick editing of a command in Bash
Sometimes when you try to execute a long command, it scrolls beyond the screen. Then if you want to modify the command and re-execute it, there is an easy way for it. Just type "fc" which will load the command in your default editor; in my case vi. Now you can modify the command in the editor and exit the editor, and your modified command is executed automatically.
For example try typing the following command in the bash shell and type "fc".$ find /etc -iname '*.conf' -exec grep -H 'log' {} \;
$ fc"fc" will bring the last command typed into an editor, "vi" if that's the default editor. Of course you can specify a different editor by using the -e switch as follows:
$ fc -e emacsTo list last few commands, type:$ fc -lFor the last 10 commands it will be:$ fc -l -10To seach for a command, type "CTRL+r" at the shell prompt for starting a search as you type prompt. Once you found your command, press enter to execute it.
If you want to transpose two characters say you typed 'sl' instead of 'ls'. Then move the cursor between 'sl' and type "CTRL+t".
Saturday, 21 May 2005
Job Control in Linux
How to Put a "Running Job" in the Background.
You use the 'renice' command for changing the priority of a running job. For example :
Linux is a multitasking operating system. Which means that you can run multiple jobs at the same time. Suppose you are logged in to a terminal which does not have X server running. And you're running a job at the terminal prompt, which is taking a very long time to complete. You want to put the job in the background. This is how you do it.
Press "CTRL - z" which temporarily suspends the job. Now run the command :$ jobs
This will list all the jobs along with a job number. Now to resume a particular job in the background, do the following:
$ bg %jobnumberin our case it will be
$ bg %1To bring the job back to the foreground again, do :
$ fg %jobnumberwhich in our case is
$ fg %1Need to kill all jobs ?
Suppose you're using several suspended vi sessions and you just want everything to exit. This is achieved by running the following command:
$ kill -9 `jobs -p`
The "jobs -p" gives the process number of each job, and the "kill -9" kills everything. Sometimes "kill -9" is excessive and you should issue a "kill -15" that allows jobs to clean-up.
Sometimes you need to list the process id along with job information. For instance, here's process id with the listing.
$ jobs -plHow to lower or raise the priority of a job
You use the 'renice' command for changing the priority of a running job. For example :
$ nice -n +15 find . -ctime 2 -type f -exec ls {} \; > last48hours
[Ctrl+z]
$ bg
Above we execute a 'find' command with a priority of 15. Then we suspended the job with a ctrl+z . Then, the job was run in the background by using the command 'bg'. Now, if you want to change the priority of the job to a lower value, you just 'renice' it as follows:
First get the process ID of the job.$ jobs -plNow lower its priority.
[1]+ 29388 Running
$ renice +30 -p 29388
29388: old priority 15, new priority 19
The range of priority goes from -20 (highest priority) to +19 (lowest priority). You can lower the priority of your program but you cannot increase the priority unless you are root.
Sharing Directories Among Several Users
Suppose your team is working on a project in "/home/share" and your team members need to create documents and programs in /home/share so that others in the team can edit and execute these documents as needed. Also only the members belonging to the team are to have access to the /home/share folder. This can be achieved easily in Linux by a combination of SGIDs and permissions.
But what is an SGID ?An SGID is short form for Set Group ID. It is a sticky bit which is usually applied to directories. When you apply a SGID to a directory, any files that are created in that directory will have the group ownership of the directory itself.
First we create the directory which we want to share with the project team members.# mkdir /home/shareNow create a group called 'share' using the groupadd script.
# /usr/bin/groupadd shareChange the group ownership of the /home/share folder.
# chown -R root.share /home/share
Set the permissions of the share folder to full permissions for users and group and none for others. Note: If you want users not belonging to the group to view the contents of the share folder, then you have to give necessary permissions for others. ie 775.
# chmod 770 /home/share
Set the Group ID bit for the /home/share folder so that any file or directory created in this folder will have the same group ownership.
# chmod g+s /home/share
$ ls -ld /home/share
drwxrws--- 2 root share 4096 May 22 06:06 share
Note the sgid bit 's' in the listing of the share folder above. Now only those users belonging to the 'share' group will have access to the /home/share folder and any file or directory created by any of the users in the /home/share folder will be owned by the 'share' group.
Lastly start adding the team members of the project to the 'share' group.# /usr/bin/gpasswd -a user1 shareAbove I have added 3 users - user1,user2,user3 - to the share group. Now if you want to add another user (say team leader) to the share group and give him special privileges for managing the users in the share group; this is achieved by using the -A switch.
# /usr/bin/gpasswd -a user2 share
# /usr/bin/gpasswd -a user3 share
# /usr/bin/gpasswd -A user4 shareNow check the /etc/group file to see the share group and members belonging to the share.
$ cat /etc/group|grep shareThe user will need to issue a reset before they can get access. As 'root' you can test their account.
...
share:x:502:user1,user2,user3,user4
...
$ su - usernameYou need to '-' to pickup their environment
$ su - user1
Friday, 20 May 2005
Creating Tape ARchives using cpio
Cpio is a tool for creating and extracting archives, or copying files from one place to another. It handles a number of cpio formats as well as reading and writing tar files. The GNU cpio performs three primary functions. Copying files to an archive, Extracting files from an archive, and passing files to another directory tree.
Suppose you want to take a tar backup of all your configuration files. This can be achieved easily by the following set of commands:
$ find /etc -iname \*.conf | cpio -o --format=tar > test.taror you could substitute the -H switch for --format in the above command for the same effect.$ find /etc -iname \*.conf | cpio -o -H tar > test.tarSame command without the redirection ">"$ find /etc -iname \*.conf | cpio -o --format=tar -F test.tar OR
$ find /etc -iname \*.conf | cpio -o -H tar -F test.tarYou can append data to an already existing tar file using the --append switch. For that first create a tar file as follows:$ find ../dir1 | cpio -o --format=tar -F test.tar Now append some data from 'dir2' to the newly created 'test.tar' file using the --append switch.
$ find ../dir2 | cpio -o --format=tar --append -F test.tarList contents of the tar file$ cpio -it < test.tar
OR
$ cpio -it -F test.tarExtract the contents from the tar fileYou use the -i switch for the purpose.
$ cpio -i -F test.tarThe advantage of 'cpio' over 'tar' is that it can take input from the 'find' command.Suppose you want to copy all (or a subset of) the files in your directory to another directory. This can be easily achieved by using the combination of find and cpio as follows:
$ find . -print0 -depth | cpio --null -pvd new-dir The interesting thing to note is the -print0 and the --null switches which act together to send filenames between find and cpio, even if special characters are embedded in the filenames. The -p switch tells cpio to pass the files it finds to the directory 'new-dir'.
Thursday, 19 May 2005
Setting up multiple IP addresses on a single NIC
In linux, you can bind multiple IP addresses on a single NIC. This is usually done in case you are using your linux machine as a web server and is hosting multiple domains and you want to bind each domain to a unique IP address. This is how it is done.
Let us assume that you already have a NIC which is bound with a static IP address. Then you will have a file called
Now to bind another IP address to the same NIC, I create a copy of the above file
Now just change the values of the DEVICE and IPADDR in the file as follows:
Note: If you do not know how to configure a NIC, see my previous posts - How to install a network card in Linux and How to assign an IP address.
Let us assume that you already have a NIC which is bound with a static IP address. Then you will have a file called
/etc/sysconfig/network-scripts/ifcfg-eth0 .My ifcfg-eth0 file has the following entries:# File: ifcfg-eth0
DEVICE=eth0
ONBOOT=yes
BOOTPROTO=static
IPADDR=192.168.0.1
NETMASK=255.255.255.0
BROADCAST=192.168.0.255
NETWORK=192.168.0.0
HWADDR=00:80:48:34:C2:84
Now to bind another IP address to the same NIC, I create a copy of the above file
ifcfg-eth0 and name it as ifcfg-eth0:1# cd /etc/sysconfig/networking-scripts
# cp ifcfg-eth0 ifcfg-eth0:1
Now just change the values of the DEVICE and IPADDR in the file as follows:
# File: ifcfg-eth0:1And lastly, restart the networking service. If you are using RedHat, then it is as simple as :
DEVICE=eth0:1
ONBOOT=yes
BOOTPROTO=static
IPADDR=192.168.0.5
NETMASK=255.255.255.0
BROADCAST=192.168.0.255
NETWORK=192.168.0.0
HWADDR=00:80:48:34:C2:84
# service network restart Note: If you do not know how to configure a NIC, see my previous posts - How to install a network card in Linux and How to assign an IP address.
Monday, 16 May 2005
Skinning your Linux Desktop
Did you know that Linux running X is fully theme-able ? If you are running KDE or GNOME or any other window manager, you can modify its look and feel to suite your tastes. In fact there are a lot of sites hosting themes which can be downloaded and used free of cost. Do you want to make your Linux desktop look like windows XP, or do you feel a special affinity for Mac OS Aqua Interface? You can make your desktop look like all these and more using themes. Two sites which caught my attention were kde-look.org and gnome-look.org These two sites host tons of themes and wallpapers which can be used to modify your desktop.

My GNOME desktop with OSX Aqua Theme.

Another KDE theme
Saturday, 14 May 2005
Burning audio and Data Cd's in Linux
Linux started its debut as a hackers operating system. So most of the things including burning CDs were (and still are) accomplished using command line tools. Though now there are excellent GUI wrappers available which shield the user by giving a nice front-end to these tools. Before I talk about the GUI available,I would like to dwell a bit on the set of command line tools which do the grunt work of burning CDs and DVDs. In Linux we have an excellent set of command line tools for burning CDs and DVDs. These are as follows:
- cdrecord,dvdrecord : These are the tools that actually burn the data or audio tracks on to your CDs and DVDs.
- mkisofs : Prior to using cdrecord, you have to create an ISO image of the files you want to burn on to the CD. This tool helps you accomplish that.
- growisofs : This is a front-end to mkisofs which can be used to create amoung other things multi-session CD/DVDs.
- cdrdao : This is just like cdrecord but can be used to create mixed CDs. That is CDs containing both data and audio tracks.
Creating an ISO image using mkisofs
syntax 1:
$ mkisofs -R -J -iso-level 2 -o output_filename.iso input_filename/directory
{-J = Jouliet} {ISO Level 1 to 3} {-R = Rockwell}
syntax 2:$ mkisofs -J -o target_file.iso -path-list your_listof_filenames.txt -graft-points
This syntax of mkisofs is used for creating a ISO image from a file containing a list of all the files that should be included in the CD ISO image. The filenames are included one per line.
syntax 3: Creating an image of an already bootable CD$ dd if=/dev/cdrom of=/path/to/iso/image.iso bs=8M
This is a two step process.
step 1: Find out the value of the dev option using the command
$ cdrecord --scanbusstep 2: Now burn the image on to the CD using the cdrecord command:
$ cdrecord -v speed=4 -data -eject dev=[the value you got in the previous step] -dao -mode1[2] /path/to/file.iso
These tools are 100% reliable and are enough to get the job of burning CDs and DVDs. But as you can see, there are a whole lot of options used and, sometimes there is the risk of mistakes happening due to passing wrong options to the commands.
Earlier I used to burn CDs using these tools for lack of a reliable and easy to use front-end. But now there are a plethora of GUI front-ends that use these tools in the background and assist the user to burn CDs/DVDs with ease.
One of these GUI's I really liked is K3b the CD creator. This package is included in all major Linux distributions including Fedora. When you start K3b, you are provided a clean and simple interface which shows in easy to understand language and icons, the things a user can accomplish. The tasks are divided into four projects that is :
- New Audio CD project
- New Data CD project
- New Data DVD project and
- CD to CD copying dialog
Other than those stated above, you can also create mixed CDs containing both audio and data tracks as well as video CDs and DVDs by accessing the [File > New Project] menu. When you give the burn command, you are provided a nice dialog box where you can select to create single session or multi-session CDs.Whether to generate RockRidge, Joliet or UDF extentions for your filesystem and many advanced options like support for ISO level 1,2,or 3 and so on. And erasing and rewriting your RW CD is a clinch.
Infact after using this excellent software, I am of the opinion that K3b can be put in the same league as its windows counterpart Nero Burning ROM. Writing CDs/DVDs in linux had never been this easy. Here are a few screenshots of the K3b CD creator user interface.
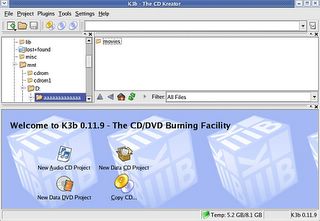
K3b CD Kreator
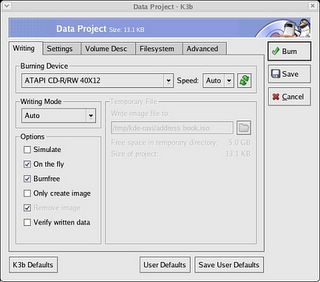
Data Project Dialog
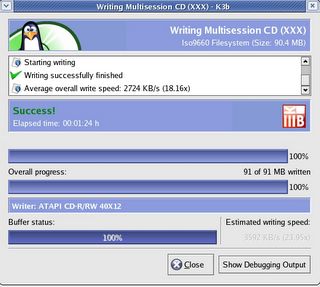
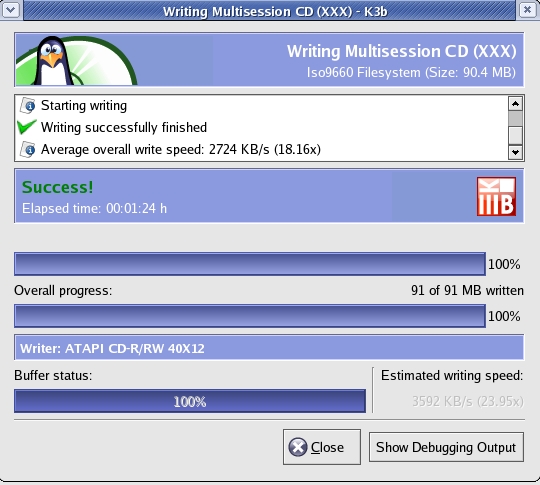
Finished Writing the CD

K3b CD Kreator

Data Project Dialog
Finished Writing the CD
Wednesday, 11 May 2005
Installing Mono on Linux
Mono is an open source initiative spearheaded by Novell to extend Microsoft's .NET on Linux and other non-microsoft platforms. The advantage of mono over .NET is that any software compiled using mono can be ported to any operating system with ease. Mono also makes use of GTK# libraries. There are a number of excellent GPLed applications that are developed using mono framework. For these applications to run on your computer, you need the mono runtime libraries installed on your machine. I have Fedora core 2 installed on my machine. And to my consternation, it didn't ship with mono. So I had to download the mono runtime from its website mono-project.com , which happened to be a hefty 39 MB download. It took me approximately 1 Hr on my 128 Kpbs cable internet connection to download and install it. On their website, you will find source as well as binary packages. There were no binary rpm packages offered for Fedora core 2 though there were rpm packages targeted at RedHat 9, Fedora Core 3 and so on which I think would have worked on Fedora Core 2. But to be on the safer side, I downloaded the binary installer by the name mono-1.1.6-installer.bin which was guaranteed to work on all distributions. The installation went smoothly, though I had to set the executable flag of the mono-1.1.6-installer.bin file before running it, which I did by running the chmod command.
# chmod u+x mono-1.1.6-installer.bin
# ./mono-1.1.6-installer.bin
The people who have migrated from windows to Linux will feel right at home using this installer which sports a nice clean GUI and there is also an uninstaller with which you can remove the software at a later time if you so choose. By default, the software installs the files in the /opt/mono-1.1.6 directory though there is an option available to install in a different location. I installed it in the /usr/local/mono-1.1.6 directory. During installation, it added the path of the mono binaries to the .bashrc file of the user account. Here I ran into a slight problem because I installed the software by logging in as root. So the installer only updated the root account's .bashrc file. Since I use an account other than root to do my work, I had to manually include the path to the mono binaries in my normal account's .bashrc file which I did as follows:
#FILE: .bashrc
$PATH=$PATH:/usr/local/mono-1.1.6/bin
export $PATH
Once the installation was completed, I took a cursory glance in the /usr/local/mono-1.1.6/bin directory. And I found lots of utilities including a command line compiler for the C# language - 'mcs', an IDE called 'monodevelop' which can be used to create applications using C# and of course a Common Language Infrastructure (CLI) virtual machine that contains a class loader, Just-in-time compiler and a garbage collecting runtime similar to those found in Sun's Java development kit.
My reasons for installing mono ?Actually I wanted to try out this nifty software called Tomboy which sports my favorite comic book character Tintin - I suspect they changed the name to tomboy so as to escape getting sued by the creators of the popular comic book. Tomboy is a simple note taking application which resides in your task bar. It helps you organize your ideas and information you deal with everyday. It's unique feature is that you can link your notes to each other as well as other documents. Also it supports rich text and recognizes hyperlinks which makes it a really productive tool. The user interface is attractive but spartan which is a good thing for people who just want to get the job done. But to run this software you need the mono runtime libraries installed on your machine. And after installing this software and using it, I feel the pains I took to install mono were worth it.
Of course, there are other really good softwares being developed on mono framework. And considering the fact that Novell has put its weight behind it, I feel, mono holds promise for the users and the developers alike.
Monday, 9 May 2005
Mounting NTFS filesystem in Linux
NTFS or New Technology File System is Microsoft's proprietary filesystem used in Windows NT, Windows 2000 and Windows XP. It is a robust filesystem having many more features like encryption, robust security, support for quotas and so on which the FAT(32) filesystem lacks. If you are dual booting your machine between windows NT/2000/XP and Linux, and if you have a NTFS partition on your hard disk, then at some point of time, you might have a need to access the data on the NTFS partition from Linux. But since NTFS is proprietary, it is next to impossible to fully support it from Linux. Which means, there is no way to write data to an NTFS partition from Linux at this point of time. The good news is you can mount the NTFS volume as read only and access your data from Linux. Here I will explain how you can achieve this.
First gather some data about your kernel. Find out the type of kernel you are using.# uname -r
2.6.5-1.358
This is needed because you need to install a module providing NTFS support to your kernel and you have to make sure the module you download have the same version number as your kernel for this to work.
Now visit linux-ntfs.sourceforge.net . I am using Fedora Core 2. So I will be explaining it with respect to Fedora. If you have a different RedHat version, then you have to visit the section on the website related to your version of Redhat. And if you are using any other distribution like debian, you can build your own module from the source provided on the website.
Now I downloaded the NTFS kernel module kernel-ntfs-2.6.5-1.358.i686.rpm from the website and installed it - logging in as root.
# rpm -ivh kernel-ntfs-2.6.5-1.358.i686.rpm
Preparing... ############################### [100%]
1:kernel-ntfs ############################### [100%]
There should be no errors, just #'s. If all goes well, you will get the message "The Linux NTFS rpm has been successfully installed".
Now execute the following command to see whether linux recognizes NTFS partition on your harddisk:
# fdisk -l /dev/hdaThis gave the output on my machine as follows:
Disk /dev/hda: 10.2 GB, 10262568960 bytes
255 heads, 63 sectors/track, 1247 cylinders
Units = cylinders of 16065 * 512 = 8225280 bytes
Device Boot Start End Blocks Id System
/dev/hda1 * 1 510 4096543+ 7 HPFS/NTFS <---o
/dev/hda2 511 523 104422+ 83 Linux
/dev/hda3 524 548 200812+ 82 Linux swap
/dev/hda4 549 1247 5614717+ f W95 Ext'd (LBA)
/dev/hda5 549 1122 4610623+ 8e Linux LVM
As you can see above, Linux recognizes the /dev/hda1 NTFS partition as HPFS/NTFS, which is what we want.
The last step is mounting your NTFS partition in linux. This is achieved by using the mount command as follows:
# mkdir /mnt/c_drive
# mount -t ntfs -r -o umask=0222 /dev/hda1 /mnt/c_drive
Also if you want to mount the NTFS partition automatically each time you boot Linux, append the following line in your /etc/fstab file.
#FILE: /etc/fstabNow you are done. If you want to know more about NTFS, then read this very good NTFS FAQ .
/dev/hda1 /mnt/c_drive ntfs ro,defaults,umask=0222 0 0
Subscribe to:
Posts (Atom)