Sunday, 30 October 2005

ClamAV - The free Anti Virus solution for Windows on Linux

There is a common perception that there are no viruses on the Linux platform - which to a large extent is true. But what happens when you get a mail attachment which you would like to forward to your windows machine so you can open it with your favorite proprietary software? And what if this attachment is infected by a virus? This is where the anti virus solutions for linux comes into the picture.
ClamAV is a free GPLed anti-virus solution which provides a lot of advantages when installed in Linux. Sticking to the philosophy of linux, it contains a set of command line tools which can be used to check if a file on your system is infected by a virus.
The installation is quite simple as executing a single command as follows:

# yum install clamav
(for RedHat based systems)
OR
# apt-get install clamav
(for Debian based systems)

ClamAV basically installs three binary tools on your system (in the /usr/bin directory), them being :
freshclam - As you know an anti-virus solution is only as good as the latest virus updates it has. This tool is used to update the virus databases on your system. It downloads the latest virus updates from the internet and keeps your anti-virus solution upto date.
clamscan - This is the tool that actually checks your files to see if they are infected.
sigtool - When you download the latest virus updates from the net, there should be a way of verifying the validity of the update. This is achieved by the sigtool. It is used to verify the digital signatures of databases and list virus signature names among other things.

This is how I use this wonderful package to my advantage. I have installed Linux alongside windows and boot via Grub bootloader (most people do). I have a FAT and NTFS partition on my harddrive which I have mounted in /mnt/C:/ and /mnt/D:/ . To check all the files in my windows partition, I just enter the command as follows (you don't have to be root to run this command):
$ clamscan --bell -r --log=/home/ravi/virus_log -i /mnt/D:/

The above command will scan my /mnt/D:/ directory (FAT32 partition) recursively (-r) and log (--log) the result in the virus_log file, will beep (--bell) each time a virus has been detected and only print (-i) infected files to the output.

clamscan can scan a wide variety of files including archive files (rar, zip, tar, deb, jar, arj ), your mails, html files ... In fact just about any file on your system.

For instance, if I want to scan a tar file, I will enter the following command:

$ clamscan --tar=/bin/tar  myfile.tgz
Same is the case for other archives. You pass the path of the archive tool in the command line.

Usually clamscan will recurse through a maximum depth of 15 levels if the -r option is used. But you can set the depth of recursion using the --max-dir-recursion option.
$ clamscan -r --max-dir-recursion=4 ~ravi/.

Here is another example of how you check only the text files on your harddisk for virus infection.
$ find . -iname \*.txt -exec clamscan -r -i {} \;

Updating the virus database
You will agree with me that the usefulness of an anti-virus solution is only as good as its virus definition files. With ClamAV, it is very easy to update the database. All it takes is executing the command :
# freshclam

And ClamAV will download the latest virus definition files from the internet and update your database. You can also run the above command as a daemon as follows:
# freshclam -d
Usually you don't have to run this command yourselves. When you install ClamAV on your machine, it creates a user and group named 'clamav' and also creates a cron job to update on a regular basis, the virus database on your machine.

ClamAV has been developed targeting firms running mail servers in mind and so is designed to check for virus on the fly. If you manage a mail server, you can integrate it with sendmail or any other mail server to check your incoming and outgoing emails for viruses.

Advantages of Clamav over other Anti-Virus suites
  1. The one and only GPLed Anti-Virus solution available with an unbeatable price tag (Free).
  2. Multi architecture and multi OS support. Clamav is available for MacOS, Windows, Linux and other Unix variants.
  3. Simple command line usage - which does away with memory bloat that other anti-virus solutions carry around. I still remember the times when my windows 98 machine would slow to a crawl when an antivirus package was installed on it.
  4. Can be linked with other linux commands to create powerful filters to check just a subset of files on your machine.
  5. You can automate the whole process of virus detection and prevention.
  6. Easy installation and uninstallation - I remember the trouble I had in uninstalling Norton Antivirus from my windows 98 machine a few years back. When I tried to uninstall Norton Antivirus, it said I should uninstall "Live Update" first and when I tried uninstalling the latter, it complained that "Norton Antivirus" was running and should be uninstalled first - in short a catch 22 situation - the only way out being a clean re-installation of windows OS. Clamav doesn't have any such problems.
  7. Lots of third party softwares with in-built support for ClamAV. For example, DansGuardian virus patch is a GPL addon that takes the virus scanning capabilities of ClamAV and integrates them into the content filtering web proxy DansGuardian.
What? You don't want to install the Clam Antivirus package just yet ? No problem, there is a Online scanning tool available from ClamAV which will help you scan a file on your harddisk without installing it.

Fig: The output of running clamscan on my machine.
Friday, 28 October 2005

The Knoppix Advantage

There is a great deal of discussion going on about which distribution is most ideal for the desktop, with people taking different sides. If you ask me, Knoppix scores over other distros when it comes to installing Linux on old machines. Let me elaborate on how I reached this conclusion.
Recently, I received a Knoppix Ver 4.0 live CD from a friend. And I decided to try it out on one of my older computers. The computer has a Celeron 333 MHz processor, with 96 MB SDRAM, Microsoft Serial IntelliMouse, Aztec 2320 chipset based ISA sound card and 440LX Intel Original motherboard - In short, a really old machine in today's standards. In the past, I have had lots of trouble in installing Linux (which includes Fedora and Ubuntu) on this machine especially problems with sound and mouse, each time having to tweak the configuration files to get both working . But when I popped in the Knoppix live CD, I was amazed to see it detecting both my sound card and mouse correctly. In fact, I saw it booting into KDE (the default window manager) without prompting for any user input.

Knoppix comes with chockfull of softwares all crammed into a 700 MB CD ROM. The CD has around 2.1 GB of softwares all compressed into a 700 MB space using a special algorithm. You get many applications preinstalled, which you have to usually download and install in other distributions.

The installation of knoppix on the hard-disk is quite simple and is aided by a script called knoppix-install. Just fire-up a terminal in knoppix and become root user. The root has no password so just typing 'su' is sufficient.
$ su
#_
# knoppix-install
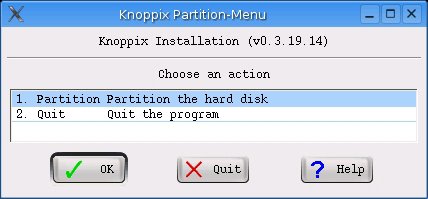
Once you enter the above commands, a nice easy to understand GUI (See Picture below) pops up and you are walked through the installation. Since it is just copying the live distribution on to your hard-disk as most choices have already been decided for you by knoppix and you just have to go through 4 simple steps.That is ...
  1. Editing your configuration
  2. Partitioning your hard disk (using QTParted)
  3. Choosing your installation method and
  4. Actual installation.
Fig: Knoppix installation GUI

Before starting the installation, you are asked for your choice from three methods of installation. They are
  1. Debian installation (recommended)
  2. Multiuser installation
  3. Knoppix installation
Then it will start copying the files on to your hard-disk and at the end will install Grub boot-loader in your MBR.

Advantages of Knoppix
  • Multimedia programs compiled with MP3 support.
  • Auto detects a wide variety of hardware including certain off-beat ISA cards.
  • Contains a lot of softwares, which usually have to be downloaded separately and installed in other distributions.
  • Knoppix is based on Debian so can easily update, install or upgrade using Apt package management.
  • Coexists with other OSes with out any problem via the GRUB boot-loader.
  • Sound configuration is automatic and is not a hassle.
  • If the hardware is atleast 4 years old, then knoppix is a viable choice of installing and using Linux.
  • Appeals to people without broadband internet who want to install a more complete Linux with support for many proprietary file formats like MP3.
  • Contains multiple window managers like KDE, Fluxbox, IceWm, twm etc.
Disadvantages of Knoppix
  • Knoppix is optimized for use as a live distro. So when installed on the hard-disk will boot up a bit slower than other distributions.
  • If you want to learn the inner working of Linux, this is not the best way. You will be better off installing a distribution like Slackware, Fedora or Ubuntu.

Fig: A cute GUI front-end for configuring a firewall in knoppix.

Fig: Screen shot of Knoppix KDE desktop running a game.

Thursday, 27 October 2005

Find the speed of your Ethernet card in Linux

For logging on to the net or for attaching as a node on a LAN, your computer needs a network card. The network card forms the interface between your computer and the network. There are different kinds of network cards available in the market depending on its speed and other features. Here is a tip to find out the characteristics of your network card.

If you want to find what type of network card is used, its speed, on which IRQ it is listed, and the chip type used, you use the following command :

# dmesg |grep eth0
Here eth0 is the first network card. If you have additional cards, it will be named eth1, eth2 and so on. And here is the output of the above command :
divert: allocating divert_blk for eth0
eth0: RealTek RTL8139 at 0xd800, 00:80:48:34:c2:84, IRQ 9
eth0: Identified 8139 chip type 'RTL-8100B/8139D'
divert: freeing divert_blk for eth0
divert: allocating divert_blk for eth0
eth0: RealTek RTL8139 at 0xd800, 00:90:44:34:a5:33, IRQ 9
eth0: Identified 8139 chip type 'RTL-8100B/8139D'
eth0: link up, 100Mbps, full-duplex, lpa 0x41E1
eth0: no IPv6 routers present
...
The important things to note here are those highlighted in colour. As you can see from the above listing, my ethernet card is a RealTek RTL8139 chipset based card on IRQ 9 (Interrupt Request). Its speed is 100 Mbps and is a full-duplex card. And the link is up.

As is the philosophy of Linux, there is more than one way of finding the same information. Linux also comes with a cute sounding tool called mii-tool which can also be used to get the same information about your network card.
# mii-tool -v eth0
eth0: negotiated 100baseTx-FD, link ok
product info: vendor 00:00:00, model 0 rev 0
basic mode: autonegotiation enabled
basic status: autonegotiation complete, link ok
capabilities: 100baseTx-FD 100baseTx-HD 10baseT-FD
10baseT-HD
...
Here -v is verbose mode. From the above listed output, one can see that the ethernet card is working as a 100baseTX, FD (Full Duplex) card which can work in the following modes :
  • 100 Mbps Speed (Full duplex or half duplex ) or
  • 10 Mbps speed (Full duplex or half duplex).
And it uses autonegotiation to bring up the link. You can call the above device as a 10/100 NIC.
Another tool which also does the same thing is ethtool. Try the following command on your machine to see the output.
# ethtool eth0

Settings for eth0:
Supported ports: [ TP MII ]
Supported link modes: 10baseT/Half 10baseT/Full
100baseT/Half 100baseT/Full
Supports auto-negotiation: Yes
Advertised link modes: 10baseT/Half 10baseT/Full
100baseT/Half 100baseT/Full
Advertised auto-negotiation: Yes
Speed: 100Mb/s
Duplex: Full
Port: MII
PHYAD: 32
Transceiver: internal
Auto-negotiation: on
Supports Wake-on: pumbg
Wake-on: p
Current message level: 0x00000007 (7)
Link detected: yes
Here full duplex, half duplex and auto-negotiation have the following meanings.
Full Duplex - Logic that enables concurrent sending and receiving. This is usually desirable and enabled when your computer is connected to a switch.

Half Duplex - This logic requires a card to only send or receive at a single point of time. When your machine is connected to a Hub, it auto-negotiates itself and uses half duplex to avoid collisions.

Auto-negotiation - This is the process of deciding whether to work in full duplex mode or half duplex mode. An ethernet card supporting autonegotiation will decide for itself which mode is the optimal one depending on the network it is attached to.

Tuesday, 25 October 2005

OpenOffice.org Version 2.0 - A definite would-be MS Office Killer

Yesterday, I downloaded the latest stable release of OpenOffice.org (version 2.0) for the Linux platform. It was 106 MB gzipped tar file. I downloaded it and unpacked it into my home directory using the command :
$ tar -xvzf OOo_2.0.0_LinuxIntel_install.tar.gz
One thing that struck me as unique was instead of finding a setup file for installing the software, there were a series of RPM packages (around 20 or so). I checked the readme files which came along with the package but there was no instruction on how to go about installing the software which was really strange. Obviously the OpenOffice team do not expect Linux users to install the software on their own because OpenOffice is bundled with all Linux distributions worth their name.

Any way, I figured out after some time that you just have to install the RPMs. Here you have a flexibility of installing only those parts of the office suite that you need. Like if you don't have a need for Impress (a presentation software), you can leave it out. I chose to install everything. So I moved into the directory containing the RPMs and executed the command:
$ su root
password : ******
# rpm -Uvh *
Note: The new version (2.0) can coexist with your older version of OpenOffice. If you chose to keep the older version then it is better to make a slight change to the above command :
# rpm -ivh *
The installation went without any glitch. And the software was installed in the directory /opt/openoffice.org2.0 . No I was not given the choice of where to install the software.

Changes with respect to previous version
  • Writer executable - swriter
  • Impress (presentation software) - simpress
  • Spreadsheet - scalc
  • Drawing Application - sdraw
  • Formula editor - smath
  • Database (a.k.a Access) - sbase ...which is a new inclusion
As you can see above, the executable files are named differently. When previously it was names like oowriter, ooimpress and so on , now the names start with 's'.

Since the software was installed in the /opt directory, I had to update my PATH to include this change. So I edited my .bashrc file to mirror that change as follows:
#File: ~ravi/.bashrc

export PATH=$PATH:/opt/openoffice.org2.0/program
... and then re-read the file as follows:

$ source .bashrc
Now I could just fire up the terminal and type 'swriter' to open the word processor.

Fig: The first time you run OpenOffice, the wizard guides you.

Fig: Toolbar of OpenOffice.org ver 2.0

New Features in OpenOffice.org Ver 2.0
  1. Appreciable decrease in startup time. In fact, ver 2.0 took less than half the time it took ver 1.11 to load on my machine.
  2. Better support for saving and opening MSWord documents.
  3. Now has MSWord ClipArts equivalent known by name FontWork Gallery.
  4. Support for accomplishing Mail Merges to email.
  5. Now you can embed movie and sound clips into your documents.
  6. Bundles with 'base' - a good database equivalent to MS Access on windows platform.
  7. Better tables, lists and bullets support than the previous version.
  8. Has a closer semblance to MS Office, which is good thing for people who are thinking of migrating from the MS Office world.
  9. Creates smaller sized PDF documents.
  10. Full support for Open Document framework.
Drawbacks of OpenOffice.org ver 2.0
  1. Lacks the setup installer (for linux platform) found in the previous versions. So not user friendly as far as installation is concerned.
  2. The binary setup comes in only two formats - the RPM and Deb. So you have to choose between the two. If you use a distribution like slackware, then this inserts an additional hurdle in installing OpenOffice.
  3. Greater dependence on JRE (Java Runtime Environment). For certain features to work properly, you need JRE installed on your machine. The problem is java is not bundled by default on Linux distributions. So you have to download it seperately and install it yourself.
Below are a few screen shots of the features I found interesting in the new OpenOffice.org ver 2.0 .


Fig: Clip art support


Fig: Document containing charts, lists and images

Fig: Support for including formulas in your document

Fig: Import data from other databases like MySql using JDBC/ODBC


Epilogue
With many governments pushing for an open document framework, and the availability of this office suite for multiple architectures and OSes, it is only a matter of time before this powerful software overturns the monopoly enjoyed by Microsoft Office Suite.

Sunday, 23 October 2005

Bash Shell Scripting - 10 Seconds Guide

This Bash shell scripting guide is not a detailed study but a quick reference to the BASH syntax. So lets begin...

Common environment variables


PATH - Sets the search path for any executable command. Similar to the PATH variable in MSDOS.

HOME - Home directory of the user.

MAIL - Contains the path to the location where mail addressed to the user is stored. Read more »

Friday, 21 October 2005

Make your bash scripts user friendly using - dialog

If you have installed Linux using the text installer, then you will find a neat professional looking install process. You can rest assured that no extreme programming has gone into creating the text installer. In fact, it has been created using a utility called dialog. Dialog is a utility installed by default on all major Linux distributions. It is used to create professional looking dialog boxes from within shell scripts.

Some of the dialogs supported are Input boxes, Menu, checklist boxes, yes/no boxes, message boxes, radiolist boxes and text boxes.

Creating a dialog is very easy. Here I will explain how to create dialog boxes of different types.
Input boxes : These allows the user to enter a string. After the user enters the data, it is written to standard error . You may also redirect the output to a file.
$ dialog --title "Ravi's Input Box" 
--inputbox
"Enter the parameters..."
8
40
As you can see, the options are self explanatory. The last two options 8 and 40 are the height and width of the box respectively.

Fig: Inputbox

Textbox : This is a box which takes a file as the parameter and shows the file in a scrollable box.
$ dialog --title "textbox" --textbox ./myfile.txt 22 70 
... it shows the file myfile.txt in a textbox.

Fig: Textbox showing the file.

Checklist : The user is presented with a list of choices and can toggle each one on or off individually using the space bar.
$ dialog --checklist "Choose your favorite distribution:" 
10 40 3
1 RedHat on
2 "Ubuntu Linux" off
3 Slackware off
... here, 10 is the height of the box, 40 - width, 3 is the number of choices, and the rest are the choices numbered 1,2 and 3.

Radiolist: It displays a list containing radio buttons. And the user can only choose one option from the set of options.
$ dialog --backtitle "Processor Selection" 
--radiolist "Select Processor type:"
10 40 4
1 Pentium off
2 Athlon on
3 Celeron off
4 Cyrix off
10 and 40 are the height and width respectively. 4 denotes the number of items in the list.

Infobox: This is useful for displaying a message while an operation is going on. For example, see the code below:
$ dialog --title "Memory Results" 
--infobox "`echo ;vmstat;echo ;echo ;free`"
15 85

Fig: Information box - listing the vmstat and free listing.

Fig: Message box

Dialog is usually used inside a script which gives the script a degree of user friendliness. There is another package called Xdialog which gives the same features for scripts executed in X Windows. Xdialog utility also has additional functionality not found in the dialog utility.
To know more about the dialog utility check the man page of dialog.

Flock - The new experimental web browser for Linux

Yesterday, I got a invitation via email for downloading and trying out Flock - the new experimental web browser. Flock is much more than just a web browser. It can easily import all your bookmarks from del.icio.us and more importantly sync your local bookmarks with your del.icio.us account. I was really surprised to find a slick editor for blogging. That is right - flock comes with an inbuilt editor which can be used to easily add content to your favourite blogs - be it a blogger account, livejournal, textpad or wordpress including wordpress.com. Here are a few screen shots to whet your appetite.


Fig: Flock Toolbar


Fig: Importing del.icio.us bookmarks (xterm output) - took a loooong time.


Fig: The blog editor (Quite slick)

Fig: Flickr photo bar

Fig: My del.icio.us bookmarks neatly categorized.

At this time though, there is no function to upload images from the editor to your blog. Importing my del.icio.us account took a very long time. Infact at one point of time, I was suspecting that something was wrong with the function of importing the bookmarks.
Installation of the browser is quite simple, the downloaded file is a compressed tar file. So all it takes is the command:
$ tar -xvzf flock-0.4.8.en-US.linux-i686.tar.gz
... and it will create a new directory by its own name and uncompress all the files there. Now you can start using the browser by moving into the just created directory and entering the command :
$ ./flock &
Advantages of Flock over Firefox
  • Has new features lacking in Firefox
  • Can synchronize your local bookmarks with your online del.icio.us account - really cool.
  • Simple inbuilt blogging editor - has support for Livejournal, Blogger, Wordpress and Textpad for starters.
  • Can just select some text on any webpage you are browsing , and publish it to your blog - which is just a right click away.
  • Can view images by just entering the flickr username in the flickr bar (See figure above).
  • Uses the Firefox codebase so inherits all the positive aspects of firefox.
  • Can easily subscribe to newsfeeds.
Disadvantages of Flock over Firefox
  • Still only a Developer 0.5 Pre version release.
  • Took an awfully long time in importing my del.icio.us account bookmarks.
  • Has to log on to the internet to view the documentation.
  • Obviously has a bigger memory footprint.
If you are interested in trying out this web browser just visit this page and download it for your platform. The Linux version is around 8.0 MB in size.