Sunday, 5 December 2004

Package Management using YUM

RedHat and other RPM based Linux distributions contain one drawback over distributions like Debian in that it is very hard to upgrade or install softwares because of dependency issues. And where Debian Linux has a very efficient and clean package management tool in the apt-get package which automatically resolves the dependency issues, redhat/ rpm based distributions lacked this. That was until yum came along. Yum stands for Yellowdog Updater, Modified for Redhat based distributions which is the counterpart of apt-get for Debian. Yum automatically computes dependencies and figures out what steps need to occur in order to install packages. It makes it much easier to maintain groups of machines without having to manually update each one using rpm.


Here I will explain how to install, uninstall and update individual packages in your Redhat Linux system. Before you start using yum, you have to modify the configuration file /etc/yum.conf. This is because the redhat repository server is severely overloaded and might be very slow. So it is in our interests to look at third party repositories. Here I will use mirrors.kernel.org as the alternate repository. So my edited /etc/yum.conf file reflecting the change is as shown below:


#File /etc/yum.conf


[main]

cachedir=/var/cache/yum

debuglevel=2

logfile=/var/log/yum.log

pkgpolicy=newest

distroverpkg=redhat-release

tolerant=1

exactarch=1

retries=20


[base]

name=Fedora Core $releasever - $basearch - Base

#baseurl=http://download.fedora.redhat.com/pub/fedora/ Linux/core/$releasever/$basearch/os/

baseurl=http://mirrors.kernel.org/fedora/core/$releasever/ $basearch/os/


[updates-released]

name=Fedora Core $releasever - $basearch - Released Updates

#baseurl=http://download.fedora.redhat.com/pub/fedora/ Linux/core/updates/$releasever/$basearch/

baseurl=http://mirrors.kernel.org/fedora/core/updates/ $releasever/$basearch/

As you can see, I have commented out the redhat fedora repository server and added the mirrors.kernel.org repository.

Also add the following two lines to the /etc/sysconfig/rhn/sources file.

yum fedora-core-1 http://mirrors.kernel.org/fedora/core/1/i386/os

yum updates-released http://mirrors.kernel.org/fedora/core/updates/1/i386
This is only for using our choosen repository with other redhat updation tools like up2date and rpm tools which also come with Fedora core 1 and above. Now you are ready to use yum.


Updating the RPM headers
(This has to be done at least once the first time before you start using yum).

This downloads the header files of the RPM packages from the repositories to your machine and will take only a couple of minutes to complete.

# yum check-update
Update all the packages installed on your system

# yum update
Update just an individual package (say gedit):

# yum update gedit
In the above case, if the gedit package installed on your system is the current version, yum will not do anything.

Install a package (say rdesktop) for the first time:

# yum install rdesktop
Suppose you have a package (say mplayer) installed and you would like a GUI interface to it. But you do not have any idea what the package might be called. You can find it out using the following command :

# yum search mplayer gui
And this is what you might see:

Gathering header information file(s) from server(s)

Server: Fedora Core 1 - i386 - Base

Server: Fedora Core 1 - i386 - Released Updates

Finding updated packages

Downloading needed headers

Looking in available packages for a providing package

Available package: mplayer-frontend.i386 2:3.48-1 from base matches with Gtk+ frontend for mplayer.

Available package: mplayer-frontend.i386 2:3.48-1 from base matches with mplayer-frontend
From the above output, you come to know that 'mplayer gui' package is known by the name mplayer-frontend. Now you can install the package as explained earlier. The search option also accepts wild card characters in the event you need to utilize them.

If you need a certain library which is not a standalone package like say libc6.1-1.so.2 . Just use the following command to search in which package, the particular library is in:

# yum provides libc6.1-1.so.2
You might get the following output:

Gathering header information file(s) from server(s)

Server: Fedora Core 1 - i386 - Base

Server: Fedora Core 1 - i386 - Released Updates

Finding updated packages

Downloading needed headers

Looking in available packages for a providing package

Available package: compat-libstdc++.i386 0:7.3-2.96.118 from base matches with

libstdc++-libc6.1-1.so.2

Available package: compat-libstdc++.i386 0:7.3-2.96.118 from base matches with

libstdc++-libc6.1-1.so.2(GCC.INTERNAL)

2 results returned

Looking in installed packages for a providing package

No packages found

... which tells that the library is in the compat-libstdc++ package which can be installed using

# yum install compat-libstdc++
To remove a package (say gedit):

# yum remove gedit
This removes the selected package as well as any other package that depends on it.

One thing worth noting is that when Yum downloads packages or updates for installation it does not remove them automatically from its disk cache, so some periodic maintenance is required.This is achieved as follows:

# yum clean all
The above command deletes any old cached packages from your system as well as removing any old rpm headers that are no longer needed.

Lastly if you want to get any additional information about a package (say xchat) without actually installing it, do the following :

# yum info xchat
As you can see, it is a piece of cake in managing packages using yum. To know more about this wonderful package management software, you may visit official yum project page or do

$ man yum

Friday, 3 December 2004

Boost your hard drive performance in Linux using hdparm

Hdparm is a command-line utility that provides powerful control over your hard drive parameters (HD PARaMeters). It can also tell you a lot about your disk drive. Everything you do with hdparm, until you make a script for it, will be done at the command line. It can be adjusted manually and then put into a startup script to make your chosen settings effective every time the system starts up.

Suppose I want to improve the performance of my first hard disk drive - /dev/hda . The first thing I do is find out the characteristics of my hard disk. This can be done as follows:
# hdparm -i /dev/hda
And the output on my machine is this :
/dev/hda:
Model=QUANTUM FIREBALLlct10 10, FwRev=A03.0900, SerialNo=872007625887
Config={ HardSect NotMFM HdSw>15uSec Fixed DTR>10Mbs }
RawCHS=16383/16/63, TrkSize=32256, SectSize=21298, ECCbytes=4
BuffType=DualPortCache, BuffSize=418kB, MaxMultSect=16, MultSect=16
CurCHS=16383/16/63, CurSects=16514064, LBA=yes, LBAsects=20044080
IORDY=on/off, tPIO={min:120,w/IORDY:120}, tDMA={min:120,rec:120}
PIO modes: pio0 pio1 pio2 pio3 pio4
DMA modes: mdma0 mdma1 mdma2
UDMA modes: udma0 udma1 *udma2
AdvancedPM=no WriteCache=enabled
Drive conforms to: ATA/ATAPI-4 T13 1153D revision 15: 1 2 3 4

* signifies the current active mode
In the output shown above, a few important values to be noted with interest are as follows:
  • MaxMultSect - The maximum number of sectors your hard disk can read at a time.
  • MultSect - The current number of sectors being read at a time.
  • PIO modes, DMA and UDMA modes - The modes supported by your hard drive. The one marked with an asterisk (*) is the one currently set.
  • AdvancedPM - Indicates whether or not your hard drive supports Advanced Power Management.
Another command :
# hdparm /dev/hda
will reveal the following information ...
/dev/hda:
multcount = 16 (on)
IO_support = 0 (default 16-bit)
unmaskirq = 0 (off)
using_dma = 1 (on)
keepsettings = 0 (off)
readonly = 0 (off)
readahead = 256 (on)
geometry = 19885/16/63, sectors = 20044080, start = 0
The items of interest in the above output are as follows:
  • multcount - The number of sectors being read at a time.
  • I/O support - The operating mode of your hard disk (16/32/32sync).
  • using_dma - Whether or not the drive is using the DMA feature. This may be on by default if your version of Linux properly detects and supports your chipset and drive's DMA capabilities.
  • keepsettings - Whether the settings are kept after the drive resets (usually caused by errors).
  • readonly - Whether the drive is read-only. Normally set to 1 only for CD-ROMs.
  • readahead - How many sectors ahead will be read when you access the hard drive.
The hdparm program provides two performance testing features that are crucial in letting you know whether or not you are improving performance or not as you tweak along.
# hdparm -Tt /dev/hda1
will show results such as the following before enhancing the performance.
/dev/hda1:
Timing buffer-cache reads: 340 MB in 2.01 seconds = 169.43 MB/sec
Timing buffered disk reads: 30 MB in 3.08 seconds = 9.73 MB/sec
and the results like these after enhancing the performance.
/dev/hda1:
Timing buffer-cache reads: 340 MB in 0.91 seconds = 200.00 MB/sec
Timing buffered disk reads: 30 MB in 1.05 seconds = 19.73 MB/sec
The goal is to see the time in seconds decrease and the MB/sec to increase in the above output.You can do that by using a variety of parameters, invoked one at a time, then rerunning the performance tests to see if things are improving or not.

For example: Begin by setting the operating mode of the interface between the system and the disk drive using one of the following parameters:
  • -c0 - Sets operating mode to 16-bits
  • -c1 - Sets operating mode to 32-bits
  • -c3 - Sets operating mode to 32-bits synchronized
Mode -c1 is usually used for best performance. Mode -c3 is required only for certain chipsets.
# hdparm -c1 /dev/hda
Next set the data transfer parameters, which you can determine from the -i command shown earlier. In the above case, the value of MaxMultSect is 16 which is the maximum supported.
# hdparm -m16 /dev/hda
Next try activating DMA mode for your system interface:
# hdparm -d1
Then set the drive mode (a value of X32 is most common; UDMA-5 is X69):
# hdparm -X32 /dev/hda
Finally, try setting the read-ahead value, which is typically set to the same value as multcount from earlier (See the hdparm /dev/hda output above), or 16:
# hdparm -a16 /dev/hda
If any or all of these settings make incremental improvements in performance, remember them and create a script that sets them all sequentially or includes them all in one line.

From all these settings, you might be using the following optimal single command :
# hdparm -X34 -m16 -c1 -a16 -d1 /dev/hda
Now save this command into a file and make the file into a script and place in the directory for the runlevel at which you normally use linux. I use runlevel 2 by default on my home machine. So I create a file named /etc/init.d/hdparm.local with the above hdparm command. Then configure it to start at runlevel 2 as follows:
# ln -s /etc/init.d/hdparm.local /etc/rc2.d/S20hdparm.local
Update (Oct 26 2007): If you are using Ubuntu or any Debian based Linux distribution, you can set the hdparm command and its options in the /etc/hdparm.conf configuration file instead of creating the above mentioned script and saving it in init.d directory. Also note that in Ubuntu Gutsy Gibbon, even the IDE drives are provided device nodes with name /dev/sda instead of /dev/hda. So make the necessary changes while executing the commands.

The next step is to keep an eye on dmesg and/or /var/log/syslog. In some cases, an error will cause the settings to be reset. So that's where the -k (keep) flag comes in. If you are 100% positive that these settings won't corrupt your data, you can add -k to the script.

WARNING : Setting hdparm parameters too aggressively - that is, in excess of the disk controller or drive capabilities - can lead to data loss. It is best to test hdparm settings on a fresh installation of the operating system before committing any applications or programs to the drive and prepare to back down on the settings and reinstall the OS if the drive is unstable or the hdparm tests show erratic results or fail.

Wednesday, 1 December 2004

Popular Linux Links

I come across loads of linux links while searching for stuff related to linux. I share some of the websites which I found to be interesting below.

LinuxHomeNetworking - This site contains a whole lot of tutorials on configuring various aspects of linux like setting up Quotas for users, DNS configuration, sendmail configuration and most things related to networking. A very good site to pick up the skills in configuring various networking related linux softwares.

TLDP.Org - This site is maintained by a loosely knit team of volunteers who provide documentation for many aspects of Linux. There are several forms of documentation: Guides, HOWTOs, man pages, and FAQs.This is one of the first places to look when you encounter a problem related to linux.

LinuxSecurity.com - This site deals with issues related to security in linux. It has the latest news, advisories, resources like white papers, HowTo's, security dictionary and newsletters.

LinuxQuestions.org - This is a linux forum where you can post your questions based on linux and get them answered by visitors to this site. Even if you are not interested in posting your question, it would be worth your time, if you browse through posts on this high traffic site. A number of times when I googled for linux related topics, I got this site consistently in the first page of the search - which speaks volumes about the popularity of this site.

L.O.S.T - A site which hosts user contributed tips on getting various jobs done in linux. The tips can be eaither downloaded as a fortune database or can be viewed online.

Linux Devcenter - This is an O'Reilly site which has lots of articles on linux. This site is specifically targeted at developers. But anybody interested in linux can gain something by visiting this site.

Kernel.org - This is the primary site for the Linux kernel source. If you are interested in downloading patches for your kernel or getting the latest kernel source, then this is the site to visit.

www-130.ibm.com - This is IBM's linux resource site for developers. Here you can obtain a wealth of tutorials and articles on configuring, administering and using linux and linux based softwares.

Linux Magazines

Redhat Magazine - An online magazine brought out by redhat. This magazine publishes articles related to redhat enterprise linux and fedora.

LinuxGazette.net - A monthly magazine dedicated to linux which can be downloaded in a variety of formats for offline viewing. I really like their 'Ask the Answer Gang' and 'MailBag' sections.

LinuxGazette.com - This is the counterpart of the linuxgazette.net magazine whose team split into two because of the difference in opinion between them. You can post your articles and questions in its forum after you have registered with their site.

LinuxFocus.org - The goal of LinuxFocus is to produce and publish a free online magazine about Linux and related issues in a number of languages. LinuxFocus is an open magazine, it is the joint effort of many people. Anyone can contribute interesting articles.

Linux-Mag - This is another online magazine which has loads of articles and tips on linux for both the newbies and the linux guru's alike.

LinuxHotBox - This is a linux eMagazine which you can download and read offline. Has quite good subject matter though the magazine itself is over a few MB's download which could be tough on dialup users. Ironically, they only have a windows exe version of their ebook for download.

Online Books

Rute - A great, must read, online book on linux. You can also get the printed version of this book.

Safari.OReilly.com - This is the online library of O'Reilly - the biggest computer book publishers in the world. You get to read most linux books published by O'Reilly here. It is basically a paid service but you can try safari free for 14 days.

These are only a few of the interesting sites I came across. You can get more linux related links on the right side bar of this site under the section 'My Linux Bookmarks'.

Sunday, 21 November 2004

RPM Package Manager

RPM is a recursive acronym for RPM Package Manager (Formerly known as Redhat Package Manager). It is the default package manager in RedHat as well as RedHat based Linux distributions like Mandrake, OpenSuSE, PCLinuxOS and so on [Read about these Linux distributions here ]. It is very powerful and can be used to install, remove, update software, as well as a whole lot of other things in Linux. Basically, RPM can be divided into 3 main areas of functionality.
  1. Packages - Files that are compressed and contain applications, data and other files.
  2. Database - A list of installed packages in a system.
  3. Compilation - Bundling a bunch of files into a package suitable for installation on other systems.
Here are a couple of important RPM commands that are frequently used by Linux users though now a days, they use other tools (such as Yum) which provide automatic dependency checking to achieve the same.

Querying - Know more about a package
You can query the RPM database to know more details about a particular package that is installed in your system. To see if a particular program (say gedit, a text editor) is installed or not, use -q to activate the query mode in RPM.
# rpm -q gedit
RPM usually responds with the name, version and release of the package installed or, more likely reports that it is not present. To see all the files that are installed for gedit and their full path, use the -l sub parameter with the query mode.
# rpm -q -l gedit
Here -q is the mode and -l is the submode. Usually you can bundle the mode and sub-mode parameters together as follows:
# rpm -ql gedit
You can also try...
# rpm -qlv gedit
... for a more verbose output.

To find, in which package the file /bin/sh is located, try :
# rpm -qf /bin/sh
bash-2.05b-38

...which tells that the file /bin/sh is situated in the package bash-2.05b-38.
Now to get more details about the bash package execute the following command:
# rpm -qi bash
...which will give a whole lot of details about the bash package installed in your system.

Installing and removing packages

Suppose you want to install a package (say gedit):
# rpm -ivh gedit-2.6.0-4.rpm

To update gedit to a newer version:
# rpm -Uvh gedit-2.8.0-6.rpm
The -U mode means, if this package is not installed, install it; if an older version of this package is installed, upgrade it.

There is a third installation mode, called freshening, represented by -F. This is similar to -U in that it upgrades a package that is installed, but it adds one restriction - it ignores any packages that are not of the same name as a package that is already installed on your system. So if you have a directory containing a bundle of rpms - say security patches - then you can move into that directory containing the security patches in RPM format and execute the command:

# rpm -Fvh *.rpm

... which will install only those security patches which are related to the packages that are already installed in your system and will ignore the rest.

To remove an already installed package say gedit, just type:
# rpm -e gedit

Drawbacks of RPM

RPM has one difficulty, ie it will not install a package if that package depends on another program that is not already installed on your system. This is known as a dependency issue. RedHat provides two utilities called rpmdb-redhat for RedHat enterprise linux and rpmdb-fedora for Fedora Core. Once you install one of these on your system, RPM will automatically begin suggesting dependency resolutions.

Of course, you can force RPM to install a package even without resolving a dependency problem by using the --force and --nodeps parameters to both the installation related modes and the remove mode. They ignore conflicts and dependencies respectively.

Suppose you do not want to install an RPM package but get one or more files in it. You can use a utility called rpm2cpio to convert your RPM package into a cpio package (which is more or less similar to a tarball) then use the command cpio to extract all the files into a directory as follows:
# rpm2cpio PackageName | cpio -id

This will extract all the files from the RPM package into the current directory. This is only a small subset of the power of RPM. To know more about it try:

# man rpm

Wednesday, 17 November 2004

Installing RedHat linux directly from the iso's saved in your hard disk

I came across an article which described how to install RedHat linux directly from the ISO's saved in your hard drive skipping the need to burn them on to a CD. The advantage of this method of installation is that, it is blazingly fast and the installation can be finished in a fraction of what it takes normally to install by booting from a CD or DVD.

But there is a catch though - this method works only if the filesystem on your hard disk is eaither of the following - FAT, ext2, ext3. If you have a file system other than those three, like resierfs, then you are out of luck. Also this method is specific to RedHat linux distribution.

You can also find a different method explained at LinuxQuestions.org.


Sunday, 7 November 2004

Connecting to BSNL dial-up Internet Server using wvdial

Bharat Sanchar Nigam Limited (BSNL) is India's largest telecom company. It is owned by the Govt. of India. BSNL provides Internet dial-up access packages (Sancharnet) which are the best deal when compared to those provided by other ISPs in the country. Here I will explain how to dial in to the BSNL server in linux using wvdial utility. It is assumed that you already have a BSNL dial-up internet account. If not then get one and come back to this page :) .

If this is the first time you are connecting to the internet, then you have to 'su' to root and execute the command :

$ su -

# wvdialconf
wvdialconf script, builds a configuration file for wvdial. It detects your modem, its maximum baud rate, and a good initialization string and generates or updates the wvdial configuration file based on this information.Now if you check the /etc/wvdial.conf file, you will see that wvdialconf has written the necessary data regarding your modem there. Now you have to open the /etc/wvdial.conf file and enter the BSNL dial-up access phone number, your username and password as follows:

; /etc/wvdial.conf file

Phone = 172222

Username = "your login name"

Password = "your password"
Also make sure that the line -

New PPPD = yes
exists in the /etc/wvdial.conf file in the [Dialer Defaults] section. If it is not there, then include that too.

Next you have to modify your /etc/resolv.conf file and enter the primary and secondary DNS servers of BSNL for name resolution. If you do not do this then, you will be able to login to the BSNL server, but will not be able to browse the web. My /etc/resolv.conf file is as follows:

nameserver 61.1.96.65 #Primary BSNL DNS Server

nameserver 61.1.128.5 #Secondary BSNL DNS server

nameserver 61.0.0.5 # Tertiary BSNL DNS server
Now to connect to the internet, just run wvdial command in the console as follows:

# wvdial
By default only root can run wvdial. To let other users execute wvdial utility, I did the following:

First I created a group called 'modem'.

# groupadd -g 503 modem
I Made sure that the group id 503 is not used by any other group; If not then you could use any other unique number greater than 500.Then I included all users who are allowed to connect to the internet to this newly created group.

# usermod -G modem ravi

# usermod -G modem sada
Then I permitted the modem group to connect to the internet by editing the sudo configuration file /etc/sudoers as follows:

# visudo
//Now you are in /etc/sudoers file

%modem localhost=/usr/bin/wvdial
From here onwards, those who are in the modem group can execute the following command to connect to the internet.

$ sudo wvdial

password: ******
My complete /etc/wvdial.conf file is as follows:

[Dialer Defaults]

New PPPD = yes ;Don't forget to include this line

Modem = /dev/modem

Baud = 14000 ;I use the linuxant driver so speed is less

Init1 = ATZ

Init2 = ATQ0 V1 E1 S0=0 &C1 &D2 +FCLASS=0

ISDN = 0

Modem Type = Analog Modem


;BSNL phone no:,username and password settings

Phone = 172222

Username = "My login name"

Password = "My Password"


Saturday, 30 October 2004

Dual Booting Windows XP/2000 and Red Hat Fedora Core 2

There are two ways in which you can dual boot between windowsXP/2000 and Linux.
  1. Install the boot loader in the Master Boot Record (MBR)
  2. Install the bootloader on the linux partition.
The first method is the easier of the two. But if by any chance, you descide to Hibernate your computer while in WindowsXP for example, then your MBR is overwritten by windowsXP and you will be unable to boot into linux using your bootloader.
Here I will explain how to overcome this setback by using the second method. That is installing the bootloader (LILO or Grub) on the linux partition . Here I am explaining the steps with respect to RedHat Fedora Core 2 distribution. But the steps are equally valid for any linux distribution.
The procedure is as follows:
  • Install WindowsXP/2000 first.
  • Now install Fedora core 2. I installed it in /dev/hda3 ; which was my linux ext3 partition.
  • While installing, enforce LBA32. This is necessary only if you intend to install the bootloader in a partition above 32GB. In my case (I have only 12 GB total) it was not necessary.
  • At the section where the installer asks whether you want to install a boot loader; select yes (Fedora comes with Grub as default boot loader) and in the advanced settings, select your linux partition as the place to install the bootloader. In my case it was /dev/hda3. Nowcomplete the Fedora core 2 install.
  • Reboot the computer and load again from the first CD in your Fedora Core 2 distribution.
  • At the boot prompt, type:
    boot: linux rescue
    ... And boot into rescue mode. Fedora will automatically try to detect your linux partition ;boot you into single user mode and mount your linux partition in the /mnt/sysimage directory.
  • Here when you get the root prompt, issue the following commands:
    # chroot  /mnt/sysimage
    # dd if=/dev/hda3 of=linux.bin bs=512 count=1
  • Now insert a floppy and copy the linux.bin file into it as follows:
    # mcopy linux.bin a:
  • Type exit 2 times - which will reboot your machine. Now remove the FC2 CD and boot into windows XP/2000.
  • Get to the command prompt and copy the linux.bin file into the C:\ drive.
    A:\> copy linux.bin  C:\
  • Finally add the following line to the boot.ini file residing in the C:\ drive.
    C:\linux.bin=" Red Hat Fedora Core 2"
  • Reboot machine and choose "Red Hat Fedora Core 2" from boot.ini menu, which will cause NTLDR to load first 512 kb from Fedora Core 2 boot partition.
  • Select from grub menu the desired kernel and press Enter.
Now even if you hibernate while in Windows XP, your bootloader will not be overwritten and you will be able to boot successfully into Linux.

Thursday, 28 October 2004

Configuring the Rockwell chipset based HSF winmodem in Linux

I have an Intel Celeron 333MHz, 98MB RAM @ 100MHz FSB, 12GB HDD computer. I had also brought an internal data/fax/voice modem with the brand name Ace for Indian Rs 750. At that time, I only had Windows 98 loaded on my machine; and the modem came with its own set of drivers for windows 98.

Recently, I decided to install the latest version of Linux. I got hold of Fedora core release 2 CDs having the latest kernel (2.6.5-1.358) and installed Linux on my machine to dual boot with windows 98. The installation went smoothly and within the hour, I was able to boot into the graphical Linux. But Linux was not able to detect my sound card (Aztec 2320 ISA) and my internal modem. I solved the sound card problem and was able to get the sound working smoothly, the details of which you can read here. Next I set out to find if there are any Linux specific drivers for my internal modem.

I googled for the same, giving the manufacturer's name but with no result. I also posted in Linux mailing lists; more specifically the Linux-India-Help mailing list.

I came to know that almost 95% of the internal modems are a striped down version of the external modems and are called winmodems because they work properly only on windows. These modems are not real modems as they depend on the software and the processor in your computer to do a part of its job. So finding a Linux driver for my internal modem depended on what kind of chipset it had. From the mailing list, I came to know that the site linmodems.technion.ac.il gave details on how to find out whether you can get your internal modem to work in Linux. I visited the site, and downloaded a Perl script called scanModem which helps you to detect the chipset of the modem; as the manufacturer's name didn't give much information.

I booted into Linux and executed the script. It probed the hardware and wrote its findings in a text file by name ModemData.txt. And it advised me to send this file as an attachment along with any query regarding my modem to discuss@linmodems.org mailing list.

I did as was suggested and within no time, I got the reply from them saying that my modem can indeed work in Fedora core 2. They told me that linuxant.com was providing a driver for my modem (which belongs to the Conexant (formerly Rockwell) HSF softmodem family). I visited their site and downloaded a zipped rpm of the driver ( hsfmodem-6.03.00lnxt04082400full_k2.6.5_1.358-1fdr.i686.rpm.zip ). They supplied precompiled version of their driver for fedora core 1 & 2 (rpm format) as well as for debian (deb format). You have to choose according to your distribution.

Then I booted into Linux and executed the following commands:

# unzip hsfmodem-6.03.00lnxt040....rpm.zip

# rpm -e hsfmodem....rpm
It installed with out any problem and created a device file named /dev/ttySHSF0 and created a soft link to /dev/modem.

Then I used kppp to set up my Internet connection. I found out that since this driver was a free version, it lets you connect at a max speed of only 14 kpbs (You have to pay $15 if you want the driver to be enabled to work at 56 kpbs speed); so you have to set the connection speed to something less than 14 kpbs if you want to browse the websites. Otherwise the modem will log in to your ISP but you will not be able to use the Internet. So I set the connection speed to 9600 in the kppp configuration dialog.

I also inserted two lines in the /etc/resolv.conf file as follows:

nameserver 215.123.12.12 #My ISP's Primary DNS server

nameserver 215.123.12.13 #Secondary DNS server
Having done this much,I was able to successfully connect to the net and browse.

Users who use Internet only to check their email and occasionally browse, can easily get by with the 14 kpbs speed. But if you are the kind who cannot do without chatting, downloading softwares and music files and heavy browsing; it is recommended that you pay them $15 and fully enable your modem driver. Or rather you should go for a broadband connection (via cable or DSL) which does not need any drivers.


My Machine Specifications

Celeron 333MHz, 98MB SDRAM @ 100MHz FSB,

440 LX Intel original motherboard,

12 GB HDD (2.1 GB Samsung HDD + 10 GB Segate HDD)

Aztec 2320 ISA sound card
Modem Specification

Rockwell International HSF 56k Data/Fax/Voice/Spkp (rev 01)

Class 0780: 127a:2015
Linux

Distribution : Red Hat Fedora Core release 2 (Tettnang)

Kernel : 2.6.5-1.358
Modem Driver Drawbacks

Max speed Limitation : 14 kpbs (for free version)

No Voice support available yet


Tuesday, 19 October 2004

Configuring Aztec 2320 chipset ISA sound card using ALSA

I have an old machine celeron 333MHz , 98 MB SDRAM 100MHz FSB, Intel 440LX motherboard and Aztec 2320 chipset ISA soundcard. Recently I installed Fedora core 2 with linux kernel 2.6 on my machine. The installation went quite smoothly other than a minor temporary glich that I couldn't move the mouse pointer while installing so had to navigate using the keyboard. But when I booted into linux after installation and tried playing a music file, It gave the error that no sound cards were detected. I know that my sound card is an Aztec 2320 based ISA card. So I went about finding out whether this sound card is supported by linux. I googled for the same, posted queries in linux mailing lists and visited comp.os.linux.hardware, alt.os.linux, alt.comp.linux newsgroups.

I found out that Alsa (Advanced Linux Sound Architecture) is a open standards group whose primary aim is to provide sound driver support for the sound cards in linux. And they are doing a commendable job. There is also another group called OSS (Open Sound System) which used to give sound support for linux. But because it had some limitations, it was not able to meet the demands of the linux community.And ALSA was able to meet those demands much better. From kernel 2.6 onwards ALSA support is compiled in the kernel by default. You can read more about it at alsa-project.org .

Coming back to my problem, I found out from their website (Thanks to Sishir Birmiwal - Ittiam Systems Ltd for pointing out this link) that Aztec 2320 is indeed supported by ALSA. The driver to be loaded is snd_azt2320.
So I logged in as 'root' and first executed the command to check if this module is loaded as follows:
# lsmod
This showed that the module is not loaded. Next I loaded the module as follows:
# modprobe snd_pcm_oss
# modprobe snd_azt2320
Then I did a lsmod and found that the module has successfully loaded. Also modprobe will load all other modules on which snd_azt2320 depends on. ie. it does a dependency check - so you don't have to worry about loading dependent modules. The module snd_pcm_oss is needed and had to be loaded seperatly because it didn't load otherwise.

For loading the snd_azt2320 module each time I boot my machine, I included the above lines in the /etc/rc.d/rc.local file. Though I wonder if there is a better way than that.

Then I included a few lines into my /etc/modules.conf file as given below.
# File: /etc/modules.conf
# ALSA portion
alias char-major-116 snd
alias snd-card-0 snd-azt2320
# module options should go here

# OSS/Free portion
alias char-major-14 soundcore
alias sound-slot-0 snd-card-0

# card #1
alias sound-service-0-0 snd-mixer-oss
alias sound-service-0-1 snd-seq-oss
alias sound-service-0-3 snd-pcm-oss
alias sound-service-0-8 snd-seq-oss
alias sound-service-0-12 snd-pcm-oss
The alsa website had suggested including a few more lines of code in the above file but It works for me with just the above lines. I guess you can include more lines of code if you have more than 1 sound card on your machine.

Alsa Mixer mutes all the channels by default. So you have to unmute and set channel values with a software mixer. I used alsamixer for the purpose but you may also use kmix for the same. Here I turned on the volume to max value, changed the PCM settings to max value and closed the program. Now I was able to hear the sound quite well.

Then I saved the settings using the command :
# alsactl store
The above command basically saves your alsa mixer settings to be retrieved for use later. Finally there was one more thing to do ie. retrieve the settings each time you reboot your machine. This I achieved by including the following line at the bottom of the /etc/rc.d/rc.local file.
# File: /etc/rc.d/rc.local file
alsactl restore
Now I optimised the alsa PCM plugins for use with alsa-aware applications. This is done in the .asoundrc file. This file has to reside in your $HOME directory. You may not have this file by default - in which case, you have to create it. My .asoundrc file contents are as follows:
// .asoundrc file
pcm.azt2320 {
type hw
card 0
}

ctl.azt2320 {
type hw
card 0
}

pcm.dsp0 {
type plug
slave.pcm "dmix"
}
In the .asoundrc file, I have included a section called pcm.dsp0 which is the dmix plugin. This is desirable as, only then will you be able to play multiple audio streams simultaneously (Which is impossible without dmix). If you don't include that section in your .asoundrc file, you will be able to hear sound from only one application at a time.

I also copied this file (.asoundrc) into my '/etc/skel' directory so that for each new user that is created, this file will be automatically copied into his/her $HOME directory.

Note: If you want to achieve some fancy stuff like adding a 5 sec delay to any of your audio streams, you may visit ladspa.org and use their plugins. You can also get a variety of plugins at plugin.org.uk . Remember, to use any plugins, you have to enter the necessary code in your .asoundrc file.

Even though the above steps are for the Aztec 2320 sound card, I believe they are valid for sound cards of any other make. Just replace snd_azt2320 module with the module of your respective sound card. Also don't forget to change the respective lines in the /etc/modules.conf file too.
Update : If you donot know the module of your sound card, you can get a clue if you browse the directories containing the modules. In Linux with kernel 2.4, the modules end with the extention '.o ' and in kernel 2.6 it is '.ko' . Just execute the following commands to check the sound modules you have on your machine:
find /lib/ -iname \*sound\*.ko
for kernel 2.6 and
find /lib/ -iname \*sound\*.o
for kernel 2.4 .

Thursday, 9 September 2004

How to make your important files stand out from the others while using Gnome in linux.

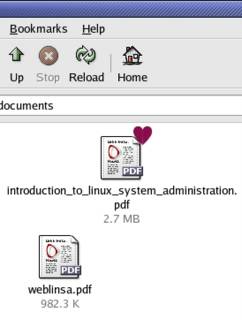
While playing around in gnome, I came across a niffy way by which you can mark a particular file or folder in gnome file manager (this works on files on the gnome desktop too) to stand out from the others. This is made possible by marking your file or folder with an emblem. That is right, by using an emblem, you can mark your important files and folders using cute icons to which you associate special meaning. For example, you can associate an emblem named "important" to a file which holds your important data and another folder which holds fun stuff can be given the emblem named "cool" and so on.

This can be achieved as follows :

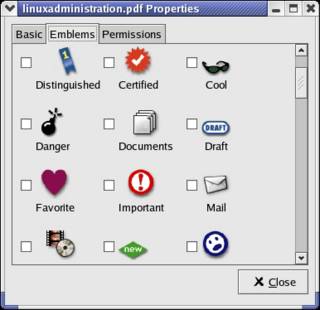
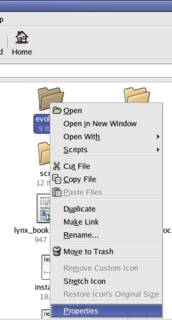
While in gnome window manager,Select the file or folder (in nautilus) to which an emblem has to be applied. Then right click keeping the mouse pointer on the selected file / folder. Then a menu pops up in which you select the "Properties" command. Then a window pops up showing the permissions that the file or folder has. There is a tab in the window named emblems. Click on it and you are shown a good collection of icons having different names like cool, important, draft, mail and so on. Make your selection and press OK button. Voila! your file sports a niffy emblem which makes it easier for you to identify from the other files or folders of similar nature. This I discovered in Gnome 2.4. But I guess it can be obtained in more recent Gnome 2.6/2.8 too (but I have tried it only in gnome 2.4).

You can also add your own set of emblems. To do that first create small icons (PNG) ideally 32x32 pixel format and then copy them into your ~/.nautilus/emblems/ directory. You can get a great set of icons at Tigert.gimp.org site.


The Menu when you right click on a file or folder. Posted by Hello


The emblem dialog Posted by Hello


The file showing the tagged emblem Posted by Hello

Sunday, 5 September 2004

SSH - Secure SHell

SSH is a Secure SHell which can be used in the place of telnet to connect to a remote machine. The advantage of using ssh over telnet is that communication and data transfer between the local machine and the remote machine occurs in a secure encrypted tunnel. So no one will be able to snoop on your data.These are a few tips in using this program.

Connect to remotehost and tunnel all X traffic over the encrypted connection.

To see how this works, run the command as follows :

$ ssh -X remotehost
...and then run xeyes when you get your shell prompt on the other machine. Notice how it automatically displays on your own X server.

Tunnelling an entire X Session over SSH

This is the method used to tunnel an entire X session from a remote host.

$ ssh -X remotehost

$ gdmXnest &

$ export DISPLAY=:20 // DISPLAY=:20 should be the same thing that gdmXnest just printed.

$ gnome-session
Note that if you aren't on the same LAN, you'll probably want to use a lightweight window manager like fluxbox instead of heavy desktops like gnome and kde.

Copying an entire directory to a remote host using SSH

Let us say you want to copy entire contents of the current directory to the directory tree /tmp/dir on the remotehost. This can be done with a combination of tar and ssh as follows:

$ tar cf . | ssh remotehost "cd /tmp/dir ; tar xf -"
Finally, some helpful information for troubleshooting SSH connections and their keys.

If you are having problems connecting to an SSH server , then the steps given below should help you in tracking down your problem as well as prevent future problems. Follow the steps given below while testing your connection after every step.

  • Check your logs.
    # less /var/log/secure
    This will contain the logs related to the ssh authentication. It is also a good idea to turn on debugging in /etc/ssh/sshd_config to better clarify the problem. Add the following line to /etc/ssh/sshd_config file.
    LogLevel DEBUG3
  • After making changes to the sshd_config file, restart the service.
    # service sshd restart
    You can now view the connection attempts in the console by issuing:
    # tail -f /var/log/secure
    To exit, just do a [Control + C]
  • Verify the keypair.
    # ssh-keygen -y
    This can be used to generate the public key for a known private key. By comparing the output of this command to what you believe to be the public key, you can determine if the key's match. For Example:
    [user@linux .ssh]$ ssh-keygen -y

    Enter file in which the key is (/home/user/.ssh/id_rsa): /home/user/.ssh/id_dsa

    [KEY Here......................................

    .

    .................................. ]

    [user@linux .ssh]$ cat /home/user/.ssh/id_dsa.pub

    [KEY Here......................................

    .

    .

    .................................. ]

    [user@linux .ssh]$
    Verify that most of the numbers look ok. The odds of two keys being off by only a few numbers are very small. The error would be blatant. If the key's do not match (or do not exist), generate new key's (See the end of this post).
  • Check your permissions. SSH is very picky about permissions, so be sure that your user has the correct rights to the files. The most important files are located in ~/.ssh . Do these as root. This assumes that your user's name is user, so you should change the name accordingly.
    # chown user:user /home/user/.ssh

    # chmod 700 /home/user/.ssh

    # chown user:user /home/user/.ssh/*

    # chmod 640 /home/user/.ssh/*

    // The following files may not exist

    # chmod 600 /home/user/.ssh/identity

    # chmod 600 /home/user/.ssh/id_dsa

    # chmod 600 /home/user/.ssh/id_rsa
  • Check the Settings in sshd_config .
    # vi /etc/ssh/sshd_config
    This file contains the settings used by the SSH Daemon. Any line preceded by a "#" is commented out and shows the default setting. For Example:
    # Port 22
    Means that no change has been made from the default, and the default is Port 22 for SSH connections. Look through the file for the following settings, and note their values. The defaults are listed here.
    #AuthorizedKeysFile .ssh/authorized_keys2

    #PasswordAuthentication yes
    For troubleshooting purposes you should comment out the above lines. Also look for:
    AllowUsers
    If that line is present, make sure that your user's name is listed. (If its not listed, you can add it for extra security.) For Example:
    AllowUsers user user1 user2
    Remember to restart the service:
    # service sshd restart
These steps should help you get an SSH session up and running using key authentication. You should be able to track any further problems from the log file, but if you follow these directions, most problems you could face should be mitigated.

Generating New Keys

Note: This is to be done as a normal user. I'm using DSA keypairs for an example.

$ ssh-keygen -t DSA
This will create two files: ~/.ssh/id_dsa and ~/.ssh/id_dsa.pub . You can optionally create a passphrase for the keys, as an added level of security.

Copy the public key to your authorized_keys2 file.

$ cat ~/.ssh/id_dsa.pub >> ~/.ssh/authorized_keys2
Copy the id_dsa to your client machine and change its permissions to read/write for the user and none for the group and others.

$ mv id_dsa .ssh/id_dsa

$ chmod 600 .ssh/id_dsa


Friday, 3 September 2004

How to use windows fonts in Mozilla (linux)

In order to do that, you needed to copy the fonts you use for Windows XP Pro to Linux. Here are the steps to get fonts over to Linux and how to activated them:
1. If you don't have a /usr/share/fonts/TrueType directory, create one.
# mkdir /usr/share/fonts/TrueType
# cd /usr/share/fonts/TrueType

2. Make sure that all the font files you're copying have lower-case extensions, so if you have files like font.TTF, rename that to font.ttf
3. Copy the fonts to /usr/share/fonts/TrueType
4. Change into that directory:
# copy  /mnt/C:\/windows/fonts/*.ttf   /usr/share/fonts/TrueType/. # cd  /usr/share/fonts/TrueType 

5. Issue the following commands to build the necessary fonts.scale and fonts.dir:
# ttmkfdir -o fonts.scale
# mkfontdir

6. This should have now created the fonts.scale and fonts.dir files
7. Now go to you /etc/X11 directory so that you can add the new font directory to the search path of your X server by adding it to the fonts section of XF86Config

8. Edit XF86Config - Go to the "Files" section and add the FontPath there, mine looks like the following after editing:
RgbPath "/usr/X11R6/lib/X11/rgb"
FontPath "unix/:7100"
FontPath "/usr/share/fonts/TrueType"

9. Now for the Mozilla part! Go to the directory you installed Mozilla in, located at /usr/local/mozilla. Change into /usr/lib/mozilla-1.4/defaults/pref. Note your mozilla may be installed somewhere else. In redhat, try
# rpm -ql mozilla grep unix.js 
to get the path where your unix.js file resides.
10. Backup the unix.js preference file so that you can get back to it if anything screws up:
11. cp unix.js unix.js.bak
12. Edit the unix.js file and look for the TrueType section and change it to look like the following snippet:

// TrueType
pref("font.FreeType2.enable", true);
pref("font.freetype2.shared-library", "libfreetype.so.6");
// if
libfreetype was built without hinting compiled in
// it is best to leave
hinting off
pref("font.FreeType2.autohinted", false);
pref("font.FreeType2.unhinted", false);
// below a certian pixel size
anti-aliased fonts produce poor results
pref("font.antialias.min", ;
pref("font.embedded_bitmaps.max", 1000000);
pref("font.scale.tt_bitmap.dark_text.min", 0);
pref("font.scale.tt_bitmap.dark_text.gain", "0.7");
// sample prefs for
TrueType font dirs
pref("font.directory.truetype.1",
"/usr/share/fonts/TrueType");
pref("font.directory.truetype.2", "/usr/X11R6/lib/X11/fonts/TTF");
//pref("font.directory.truetype.3",
"/u/sam/tt_font3");
pref("font.FreeType2.printing", true);

Now you'll enjoy a MUCH clearer veiw of websites you visit!

Monday, 23 August 2004

Steps to Compile a Kernel

First download and install the kernel source to your machine. Then move to that directory. In redhat linux the source is usually installed in a directory named linux-2.x.xx.xxx in the /usr/src directory. And a soft link to that directory is created by the name linux-2.4 (Assuming it is the source of the linux 2.4 kernel). So the kernel source is installed in /usr/src/linux-2.4 directory.

Now move to this directory.

# cd /usr/src/linux-2.4
The next step is creating the configuration file (.config). This can be done in three ways.

# make config - brings up a command-line console mode interface.

# make menuconfig - brings up a ncurses based GUI Interface.

# make xconfig - brings up a X GUI based user friendly interface.
You may use any one of the above three commands.Depending upon the command that was executed, you will get a relevent interface using which you can configure your kernel before it is compiled.For example, you can select the proper processor type in the configuration dialog. Another thing is you can decide whether to build a functionality directly in the kernel or load it as a module when the kernel needs it.This will optimise your kernel for your computer and will help decrease the size of your kernel. The end result is your linux machine starts much faster.

After you have made the changes to the settings, you have to save and exit.Then all the changes you made to the configuration file has been saved at /usr/src/linux-2.4/.config

Now the next step is to make the dependencies. For that execute the following commands.

# make dep

# make clean
The first of these commands builds the tree of interdependencies in the kernel sources. These dependencies may have been affected by the options you have choosen in the configure step. The 'make clean' purges any now-unwanted files left from previous builds of the kernel.

The next step is the actual compilation of the kernel. Here you can opt to create a compressed image by executing the command

# make bzImage
Or if you opt for a non compressed image then you can execute the command

#make zImage
The time taken for compilation of the kernel depends on the speed of your machine. In my machine (Celeron 333MHz) it took around 15-20 mins.

After the compilation is complete, you can find your newly compiled kernel here : /usr/src/linux-2.4/arch/i386/boot/bzImage .

If you have enabled loadable modules support in the kernel during configuring, then you have to now execute the commands

# make modules

# make modules_install
Loadable modules are installed in the /lib/modules directory.

Now to start using your newly compiled kernel, you have to copy the kernel into the /boot directory.

# cp /usr/src/linux-2.4/arch/i386/boot/bzImage /boot/bzImage-mykernel-sept2004
Now open your boot configuration file (I used lilo) in your favourate editor and insert the following lines to boot linux using your new kernel.

# vi /etc/lilo.conf
//Inside lilo.conf file

image=/boot/bzImage-mykernel-sept2004

label=myker

root=/dev/hda3

read-only
My root is located at /dev/hda3 which I found out using the command

# df /
Now don't forget to execute the 'lilo' command to update the changes in the boot loader. Reboot your machine and in the lilo prompt, select 'myker' and press enter to start loading your newly compiled kernel.

Sunday, 11 July 2004

Read, write and move files to and from an MS-DOS formatted floppy in Linux

I have been asked a number of times as to whether Linux can read files from an MS-DOS formatted floppy. And the answer is yes it can and the method to do it is to mount the MS-DOS formatted floppy to a mount point and then read the files from there. Usually in Linux your first floppy drive will be allocated the device name /dev/fd0. So you can mount the floppy to the mount point /mnt as follows :
# mount -t msdos /dev/fd0 /mnt
And then you can access the files from the /mnt directory. Once you have mounted a device, you have to remember to unmount it before you detach the device. So in the case of the floppy, before you remove it from the floppy drive, you have to run the command:
# umount /mnt
Easier method :
But there is an easier way of reading and writing to a floppy which is formatted with an MS-DOS file system such as FAT16. That is by use of the commands in the mtools package which is usually installed by default in most major Linux distributions. A cursory look at the mtools package shows that there are around 26 command line tools in it. But the beauty of mtools is that if you have ever used commands in MS-DOS you will be perfectly at home using the commands in mtools package too.

First to get an idea of the different commands bundled with mtools, fire up a terminal and execute the command 'mtools' as follows:
$ mtools
Supported commands:
mattrib, mbadblocks, mcat, mcd, mclasserase, mcopy, mdel, mdeltree
mdir, mdoctorfat, mdu, mformat, minfo, mlabel, mmd, mmount
mpartition, mrd, mread, mmove, mren, mshowfat, mtoolstest, mtype
mwrite, mzip
From the above output, you will recognize a number of msdos commands such as copy, attrib, deltree, dir, format and so on but with the exception that they have the letter 'm' prepended to it. And these commands accomplish the same tasks as those of the MSDOS counterpart.

For instance to list the contents of a MSDOS formatted floppy, insert the floppy in the floppy drive and run the following command :
$ mdir a:
And it will display all the files and directories in the floppy. Similarly to copy a file from the Linux partition to the floppy, run the mcopy command as follows :
$ mcopy /home/ravi/test.txt a:/.
... and the file 'test.txt' gets copied to the floppy.

To format the floppy with an MSDOS file system, use the 'mformat' command and so on.

One thing worth noting is that to use mtools, you do not have to mount the floppy which is a plus point of these set of tools. You can learn more about the respective commands by viewing the man page of each of them.